Your New Power Rack Just Arrived – Here's How to Set It Up Without Losing Your Mind
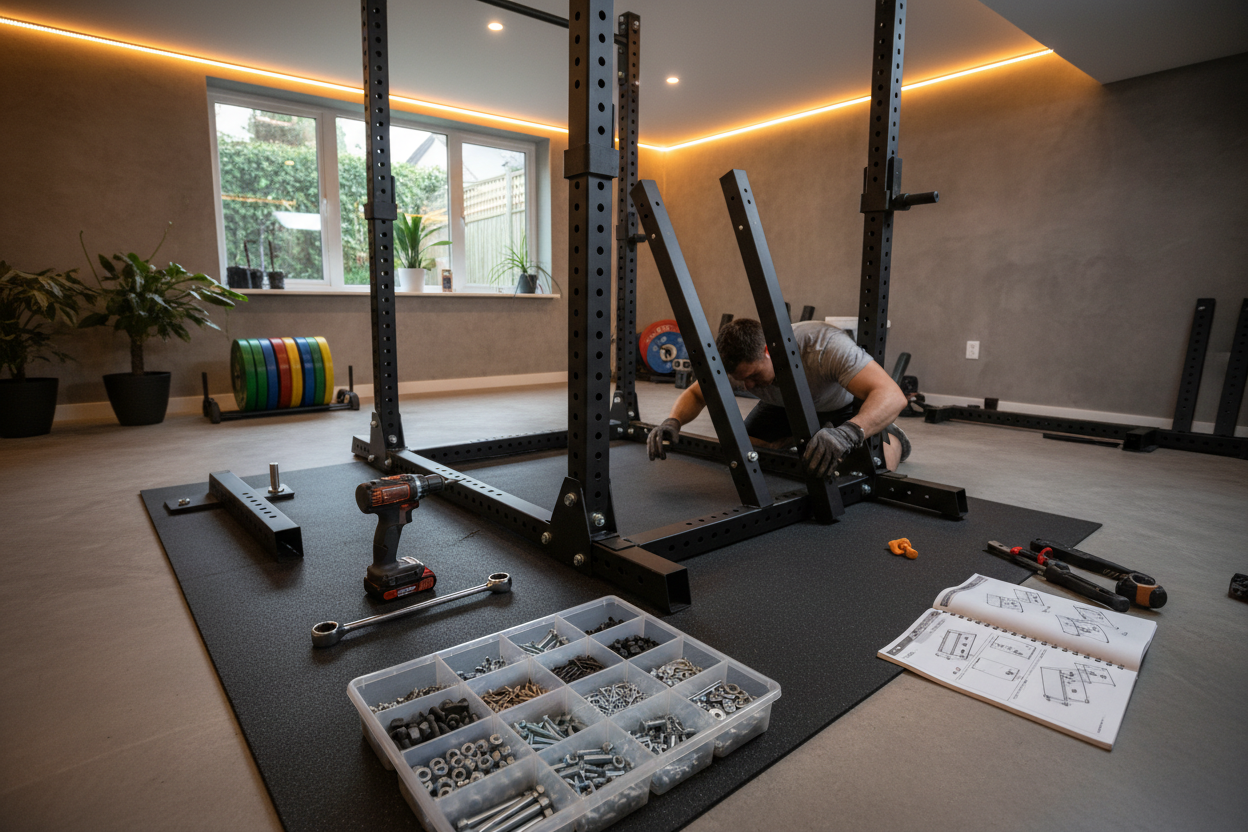
There's nothing quite like the excitement of unboxing a new power rack for your home gym. I remember when mine arrived – this massive box sitting in my hallway, and me standing there with a cup of tea thinking, "Right, let's do this." Whether you've invested in a HulkFit power rack or grabbed one of those everyday essentials models, the assembly process doesn't have to be the nightmare some people make it out to be. Trust me, if I can build one while my dog tried to "help" by stealing the bolts, you absolutely can too.
The truth is, setting up your power rack properly is just as important as the workouts you'll do on it. A wobbly rack isn't just annoying – it's downright dangerous when you're lifting heavy. But before we dive into the nuts and bolts (literally), let's talk about why getting this right matters so much for your fitness journey.
Why Your Power Rack Assembly Actually Matters
Look, I get it. You're buzzing to start training, and the last thing you want is to spend hours reading instructions. But here's the thing – a properly assembled power rack is the foundation of safe strength training at home. When you're pushing yourself under a loaded barbell, you need to know that your equipment has your back. One loose bolt or misaligned upright could be the difference between a successful PR and a trip to A&E.
I've seen people rush through assembly, skip steps, or assume all power racks go together the same way. They don't. The hulkfit power rack assembly instructions differ from other brands, and even within the same brand, different models have their quirks. That's why treating this as part of your fitness commitment – not just a tedious chore – will pay dividends for years to come.
Before You Start: The Prep Work Nobody Talks About
Here's what I wish someone had told me before I started: clear a proper workspace. And I mean proper. You'll need at least a 3-meter by 3-meter area with good lighting. Lay down some cardboard or an old blanket to protect your floor and the rack's finish. Nothing worse than scratching your new equipment before you've even used it.
Gather your tools beforehand. Most power racks come with the basics, but having your own set of Allen keys, adjustable wrenches, and a rubber mallet makes life easier. I always keep a magnetic tray nearby for all those little bits and pieces – trust me, you don't want to be hunting for washers on your hands and knees.
Check the everyday essentials power rack assembly instructions or your specific model's manual before opening anything. I know, I know – who reads instructions first? But take ten minutes to skim through. You'll spot if any parts are missing before you're halfway through assembly and realize you're stuck.
The Assembly Process: Breaking It Down
Most power racks follow a similar assembly pattern, but the hulkfit power cage assembly instructions have some specific steps that are worth highlighting. Generally, you'll start with the base frame, build up the uprights, add the pull-up bar, and then attach all the safety features and accessories.
Starting With the Foundation
Begin by laying out all your parts and doing a proper inventory. Match each piece to the parts list in your instructions. This might feel tedious, but it's far better than discovering you're missing a crucial bolt when you're nearly finished. The hulkfit power rack instructions typically label parts with letters or numbers – keep the manual open on your phone or tablet so you can reference it easily.
The base frame is your starting point. Don't fully tighten any bolts yet – just hand-tighten them. This is crucial because you'll need some wiggle room to align everything properly. I learned this the hard way when I tightened everything as I went and then couldn't get the uprights to line up. Had to loosen everything and start again. Not my finest moment.
Building Upward
Once your base is loosely assembled, attach the uprights. This is usually a two-person job, though I've managed it solo by propping things against the wall. If you're following the everyday essentials power rack assembly instructions, you'll notice they often recommend having a helper for this bit. They're not wrong. The uprights are heavy and awkward, and trying to hold them in place while threading bolts is like trying to pat your head and rub your belly while doing a handstand.
Make sure everything is square and level before you start tightening. Use a spirit level if you have one, or even a smartphone app will do. An unlevel rack will feel wrong when you're training, and it puts uneven stress on the frame.
The Top Assembly and Pull-Up Bar
The pull-up bar and top cross members tie everything together – literally. This is where your power rack starts to feel solid and stable. When you're working through the hulkfit power rack assembly instructions, pay special attention to the orientation of the pull-up bar. Some models have specific front-to-back positioning, and getting it wrong means taking it apart and flipping it around.
Now's the time to go through and properly tighten all your bolts. Work in a pattern – don't just tighten one completely and move to the next. Go around tightening each bolt a bit at a time, keeping even tension across all connections. This ensures everything settles into place correctly.
Safety Features: Don't Skip These Bits
The safety spotter arms or bars are possibly the most important parts of your power rack. These are what catch the barbell if you fail a rep. I've used mine more times than I'd like to admit, and I'm grateful every single time that I installed them correctly.
When you're going through the hulkfit power cage assembly instructions, you'll see specific torque requirements for these safety components. Don't eyeball it. These bolts need to be tight enough to handle serious weight. If your instructions specify a torque setting, it's worth borrowing or buying a torque wrench.
The Final Checks
Before you load any weight onto your new rack, do a thorough safety check. Give everything a good shake. Seriously, grab the uprights and try to wobble them. They should feel rock solid. Check every bolt is tight. Run your hands along all the welds and joints looking for any sharp edges or defects.
Test all the adjustable parts – the J-hooks, safety bars, and any other attachments. They should slide smoothly but lock in firmly. If something feels loose or catches, don't ignore it. Better to sort it now than mid-workout.
Common Mistakes to Avoid
Over the years of helping mates set up their home gyms, I've seen the same mistakes crop up repeatedly. The biggest one? Not anchoring the rack when the instructions say to. I know it seems like overkill, especially if you're on carpet or rubber flooring, but anchoring prevents the rack from walking during use and adds an extra layer of safety.
Another common error is mixing up left and right parts. Many power racks have mirror-image components, and using the wrong one on the wrong side can throw off the whole assembly. The everyday essentials power rack assembly instructions usually mark these clearly, so pay attention to those L and R labels.
People also tend to overtighten bolts, which can strip threads or crack welds. Tight is good; Hulk-smash tight is bad. You want firm and secure, not testing the limits of the metal.
Making It Your Training Partner
Once your rack is assembled, take a moment to appreciate what you've built. This isn't just a piece of equipment – it's your training partner, your safety net, and your ticket to getting stronger. I still remember my first workout on my newly assembled rack. Just some squats and pull-ups, nothing fancy, but it felt brilliant knowing I'd put it together properly.
Your power rack will be there for every PR, every tough session when you don't feel like training, and every moment when you push past what you thought possible. Taking the time to assemble it correctly, following those hulkfit power rack instructions or whatever manual came with your model, is an investment in your safety and your fitness future.
Now get that rack built, and let's get training. Your home gym is waiting, and trust me, there's nothing quite like the freedom of having your own power rack ready whenever you are. No waiting for equipment, no gym commutes, just you and the iron. Brilliant.