Stop Wasting Your Reps: The Only Squat Guide You Actually Need
The squat is often called the king of all exercises, and for good reason. It recruits more muscle fibers than almost any other movement, triggering a systemic growth response that benefits your entire body. Yet, walk into any commercial gym, and you will see a dozen different people performing this movement in a dozen different ways—many of them dangerous. Mastering this compound lift isn't just about showing off how much iron you can load onto a bar; it is about longevity, mobility, and building a foundation of true strength.
Many beginners overcomplicate the process or, worse, ignore the mechanics entirely in favor of adding weight. If you are looking to understand how to do leg squats with perfect form, the answer lies in stripping away the ego and focusing on biomechanics. The movement is natural—toddlers do it perfectly when reaching for a toy—but years of sitting in chairs have ruined our hip mobility and glute activation. Relearning this pattern requires patience and attention to detail.
The Setup: Building Your Foundation
Before you even think about bending your knees, you need to establish a solid base. A collapsed arch or a loose upper back will ruin the lift before it begins. Start by positioning your feet. While the textbook often says "shoulder-width apart," your ideal stance depends on your unique hip anatomy. Some people feel stronger with a wider stance and toes pointed slightly out, while others prefer a narrower setup. Test this by doing a few bodyweight reps to see where your hips feel the most open and comfortable.
Once your feet are set, screw them into the floor. Imagine trying to spread the ground apart with your feet without actually moving them. This action engages your glutes and creates tension in your legs. If you are using a barbell, grip it tightly and pull it down into your traps to engage your lats. A tight upper back protects your spine. Take a massive breath into your belly—not your chest—and brace your core as if someone is about to punch you in the stomach. This intra-abdominal pressure is your weight belt; do not let that air out until the rep is complete.
The Descent and The Drive
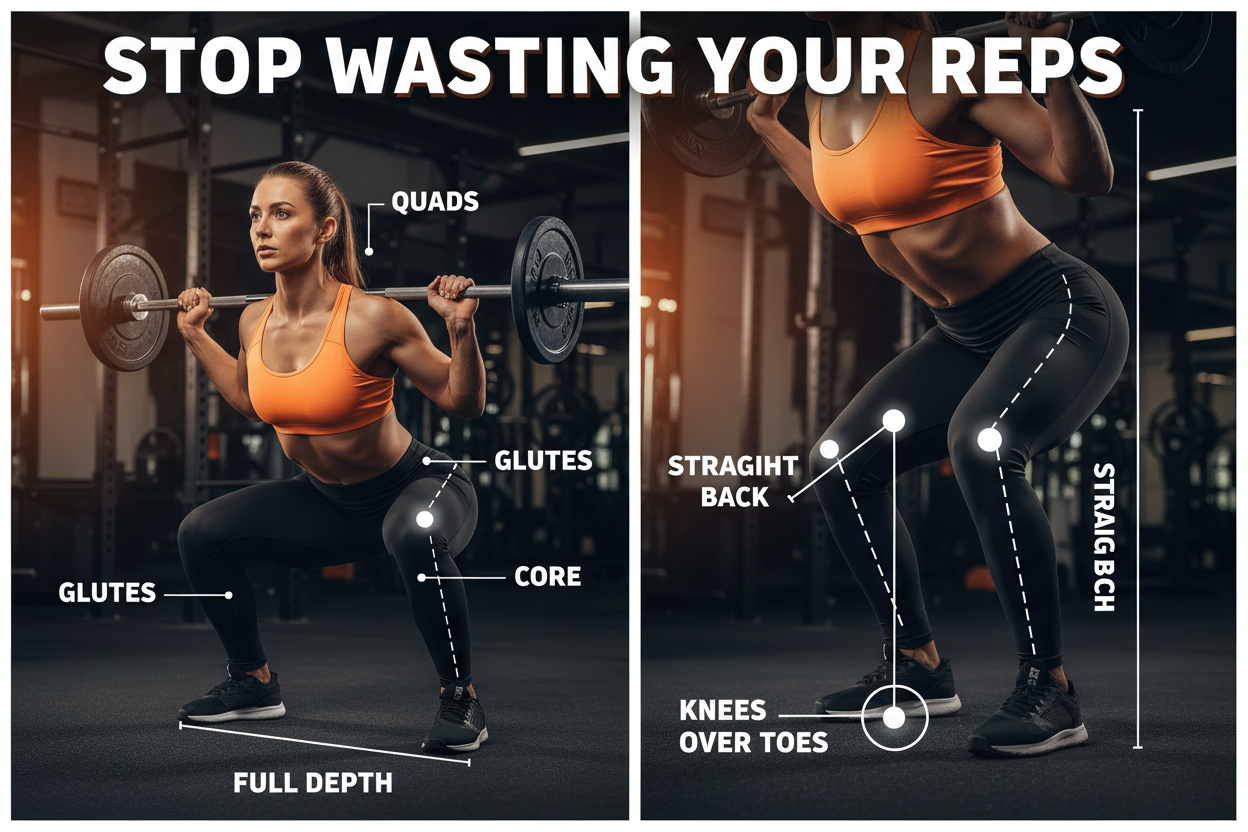
Initiating the movement correctly is where most people fail. Do not just bend your knees. Instead, break at the hips and knees simultaneously. Think about sitting back onto a low chair. As you descend, drive your knees outward in line with your toes. If your knees cave inward (valgus), you lose power and risk injury. Control the weight on the way down; gravity is not your friend here. You should own every inch of the descent.
Depth is a controversial topic, but generally, you want to lower your hips until the crease of your hip is below the top of your knee. This ensures full muscle activation. Once you hit the bottom, do not pause. Drive explosively back up by pushing the floor away from you. Keep your chest up and your hips under the bar. A common error is letting the hips shoot up faster than the shoulders, turning the squat into a dangerous "good morning" exercise for your lower back.
My Struggle with Depth and Ego
I spent the first two years of my training career doing what I call "quarter squats." I loaded up the bar with plates I had no business lifting and moved the weight about four inches down and up. I thought I was getting strong because the numbers were going up, but my legs stayed skinny, and my lower back was constantly tight. It wasn't until a powerlifting coach humbled me by stripping the bar to just the metal and forcing me to pause at the bottom that I realized how weak I actually was. It took six months to rebuild my squat from scratch, but the size and strength gains I saw in that half-year dwarfed the previous two years combined. Leaving your ego at the door is the hardest part of the lift.
Targeting the Right Muscles
While the squat is a compound movement, slight adjustments can shift the emphasis. If you are trying to figure out how to do squats for legs with a focus on the quadriceps, consider a high-bar placement or front squats. These variations force a more upright torso, which increases the degree of knee flexion and puts more load on the quads. Conversely, a low-bar back squat, where the bar rests on the rear deltoids, typically recruits more of the posterior chain—the glutes and hamstrings—due to the more significant hip hinge required.
Regardless of the variation, the mind-muscle connection remains vital. Don't just go through the motions. Visualize your quads extending the knee and your glutes driving your hips forward. If you struggle to feel your legs working, try slowing down the tempo. A three-second descent followed by a one-second pause at the bottom will humble even the strongest lifter and force the target muscles to do the work.
Common Squatting Mistakes to Avoid
Even experienced lifters fall into bad habits. One of the most pervasive issues is the "butt wink," where the pelvis tucks under at the bottom of the movement. This usually signals tight hamstrings or poor ankle mobility. If your lower back rounds at the bottom, cut your depth just before that rounding occurs and work on your mobility separately. You cannot force range of motion that your body doesn't possess.
Another frequent error is heel lift. If your heels peel off the ground as you descend, your weight is shifting too far forward, placing immense stress on your knees. This is often an ankle mobility restriction. You can temporarily fix this by placing small plates under your heels or wearing weightlifting shoes with a raised heel, but you should aim to improve your dorsiflexion through stretching and soft tissue work.
Progression and Variations
You do not need a barbell to reap the benefits of squatting. In fact, most people should start with Goblet Squats. Holding a dumbbell or kettlebell at chest height acts as a counterweight, naturally helping you keep your torso upright and allowing you to sink deeper into the squat. It is the perfect teaching tool for learning the mechanics without the fear of getting crushed by a heavy bar.
Once you have mastered the bodyweight and goblet variations, you can move to the barbell back squat. Progressive overload is key here. Add weight slowly. Five pounds added to the bar every week or two adds up to massive gains over a year. Consistency beats intensity in the long run. Listen to your body; some days you will feel strong, and other days the bar will feel heavy. That is normal. The goal is to show up and execute the movement with precision every single time.
Remember that fitness is a journey of movement quality. Mastering the squat will translate to better performance in running, jumping, and daily activities like picking up heavy objects. Treat the movement with respect, prioritize your form, and the strength will follow.
Frequently Asked Questions
How deep should I squat if I have bad knees?
You should only squat to a depth that is pain-free. While full depth is ideal for muscle development, stopping at parallel or slightly above is acceptable if going lower causes joint pain. Focus on controlling the descent and keeping your shins as vertical as possible to reduce shear force on the knee.
Should my knees go past my toes?
Yes, it is generally safe and often necessary for your knees to track past your toes to achieve full depth, provided your heels remain flat on the ground. This movement depends largely on your limb length and ankle mobility. Restricting forward knee travel can actually transfer more stress to the hips and lower back.
How often should I train legs?
For most natural lifters, training legs twice a week allows for sufficient volume and recovery. This frequency strikes a balance between stimulating muscle protein synthesis and allowing the central nervous system to recover from the heavy load that squatting demands.
