Stop Paying Gym Fees: The Ultimate Guide to Building a Garage Gym That Lasts
There is a specific kind of freedom that comes with canceling a commercial gym membership. No more waiting for the squat rack on a Monday evening, no more wiping down someone else’s sweat, and no more commuting back and forth just to move some iron. Building a home gym is an investment in your health and your time, but it requires a shift in perspective. You aren't just buying equipment; you are designing a space where you can fail safely and progress consistently. The centerpiece of this sanctuary is almost always the rack. Choosing the right setup determines what exercises you can perform and how heavy you can go without a spotter.
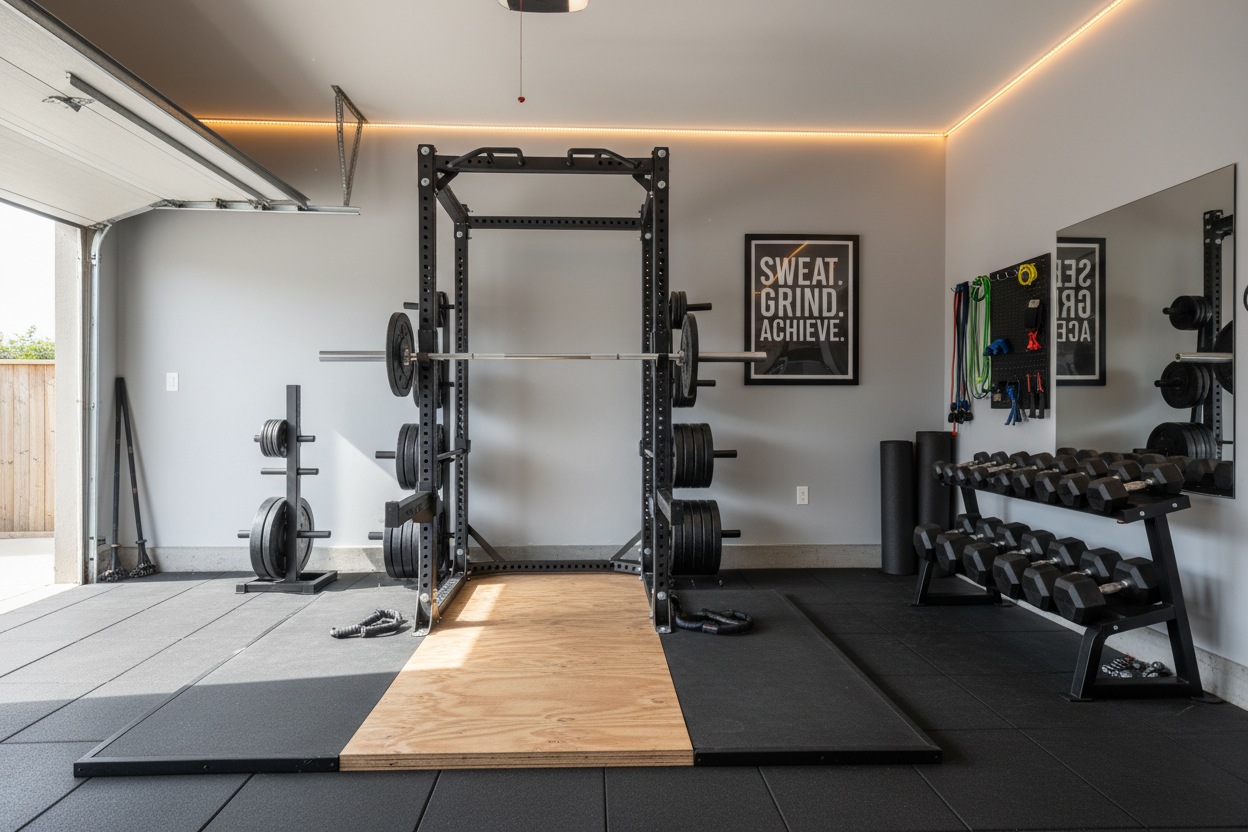
Many people rush into buying dumbbells or a treadmill, but seasoned lifters know that a sturdy garage weight rack is the foundation of functional strength training. It transforms a dusty storage space into a legitimate training facility. Whether you are into powerlifting, CrossFit, or general bodybuilding, the rack is where the majority of the work happens—squats, bench presses, rack pulls, and overhead presses all rely on this steel frame.
My Transition to the Garage
I still remember the first winter I spent training in my garage. I had spent years in climate-controlled commercial facilities, so the shock of grabbing a freezing cold barbell in January was a wake-up call. I had purchased a mid-range power rack off a local marketplace listing, thinking it would be "good enough." Within a month, I realized my mistake. The rack wobbled every time I re-racked anything over 200 pounds, and the hole spacing was so wide that I couldn't find a comfortable height for my bench press safety pins. I ended up selling it at a loss and upgrading to a heavy-duty 3x3 steel cage. That experience taught me that your equipment needs to inspire confidence. When you are under a heavy bar alone in your house, you need to trust that the steel catching you won't buckle.
Understanding Your Space and Needs
Before you start browsing specifications, look at your available floor space. A standard two-car garage usually has plenty of room, but if you actually plan to park a car in there, your options change. A full power cage offers the most safety and stability, but it eats up a significant footprint. If space is tight, a folding garage workout rack might be the better solution. These wall-mounted units hinge inward against the wall when not in use, protruding only a few inches. They allow you to reclaim the floor space for parking or other family needs while still providing a robust platform for heavy lifting.
Ceiling height is the other silent killer of home gym dreams. Most racks are between 80 and 90 inches tall. If you have low rafters or a garage door opener rail running through the middle of the room, you must measure carefully. You need clearance not just for the uprights, but for your head during pull-ups. Nothing ruins a workout faster than slamming your skull into a ceiling joist.
The Anatomy of a Quality Rack
When evaluating a weight rack for garage use, ignore the flashy marketing photos and look at the numbers. The gold standard for home gym equipment is 11-gauge steel. The lower the gauge number, the thicker the steel. Cheap racks often use 14-gauge or higher, which feels flimsy and unsafe under load. You also want to look at the dimensions of the uprights. 2x2 inch posts are common on budget models, but 3x3 inch posts are the modern standard for compatibility with attachments.
Hole spacing is another critical factor often overlooked by beginners. Look for "Westside" hole spacing through the bench press zone. This means the holes are spaced 1 inch apart (or 25mm) rather than the standard 2 inches. This granular adjustment allows you to set safety spotter arms at the exact height of your chest, ensuring you can escape a failed lift without the bar crushing you, yet without the safeties limiting your range of motion.
Safety Features for Solo Lifters
Training alone changes the safety dynamic. In a commercial gym, you can ask a stranger for a spot. In your garage, you are on your own. This makes the safety systems on your rack non-negotiable. Standard pin-and-pipe safeties are reliable but can be tedious to adjust and damaging to your barbell if you drop weight on them aggressively.
Many lifters prefer safety straps or flip-down spotter arms. Straps are excellent because they protect the knurling on your barbell and dampen the noise of a dropped weight—a crucial feature if you have family sleeping upstairs or neighbors close by. Whatever style you choose, ensure the weight capacity of the safety system far exceeds what you plan to lift. If your max squat is 400 pounds, you want safeties rated for at least 1,000 pounds to account for the dynamic force of a dropped bar.
Installation and Flooring
A rack is only as stable as the ground it sits on. Most garage floors are sloped slightly toward the door for drainage. While a slight slope is usually manageable, significant unevenness can make squatting feel awkward. You should never place a rack directly on concrete. It can chip the foundation and damage your equipment. Horse stall mats (usually 3/4 inch thick rubber) are the industry standard for garage gym flooring. They are durable, absorb shock, and provide excellent traction.
For full cages, bolting the unit to the floor is recommended but not always mandatory if the rack has a stabilizing flat-foot base. However, if you are buying a half-rack or a wall-mounted garage workout rack, proper anchoring is essential. This usually involves drilling into the concrete slab or mounting stringers into the wall studs. If you aren't comfortable with masonry bits and lag bolts, hire a handyman. A rack pulling out of the wall mid-workout is a catastrophe you want to avoid.
Climate Control and Maintenance
Garages are harsh environments. They fluctuate in temperature and, more dangerously for your equipment, humidity. Oxidation is the enemy of your garage weight rack. Bare steel or black oxide finishes will rust quickly in a humid garage. Powder coating is the most common protection and works well, provided it doesn't get chipped. If you live in a particularly humid area, consider a rack with stainless steel uprights or zinc coating.
Maintenance is straightforward but necessary. Wipe down your uprights and the barbell periodically to remove chalk and sweat, which attract moisture. Once a month, check the bolts on your rack. The vibration from racking heavy weights can loosen hardware over time. A quick turn with a wrench ensures the structure remains rigid.
Expanding Your Setup
The beauty of a high-quality rack ecosystem is modularity. Once you have the frame, you can add attachments that replace other bulky machines. Dip bars, landmine attachments, lat pulldown pulleys, and jammer arms can all mount directly to the uprights. This versatility allows you to perform isolation movements and accessory work without needing 500 square feet of space. Start with the basics—the rack, a bar, and plates—and build out the accessories as your training demands evolve.
Frequently Asked Questions
Do I really need to bolt my rack to the floor?
If you are using a squat stand or a lighter half-rack, bolting it down is highly recommended to prevent tipping during re-racking or kipping movements. However, heavy-duty full power racks with a "flat foot" base are generally stable enough to use without bolting, provided you aren't performing dynamic movements like muscle-ups attached to the outside of the frame.
What is the minimum ceiling height needed for a home gym?
You typically need at least 8 feet (96 inches) to comfortably accommodate a standard rack and allow for pull-ups where your head goes over the bar. If you plan on doing standing overhead presses, you will need to measure your reach height plus half the diameter of plates; if your ceiling is too low, you may need to perform these exercises seated.
Is a garage gym cheaper than a membership?
In the short term, no; the upfront cost of a quality rack, barbell, and weights usually ranges from $1,000 to $3,000. However, most equipment lasts a lifetime with minimal maintenance, meaning the setup usually pays for itself within 2 to 3 years compared to the cost of an average monthly gym membership and travel costs.
