Building the Beast: A Real-World Guide to Setting Up Your Rogue Monster Lite Rack
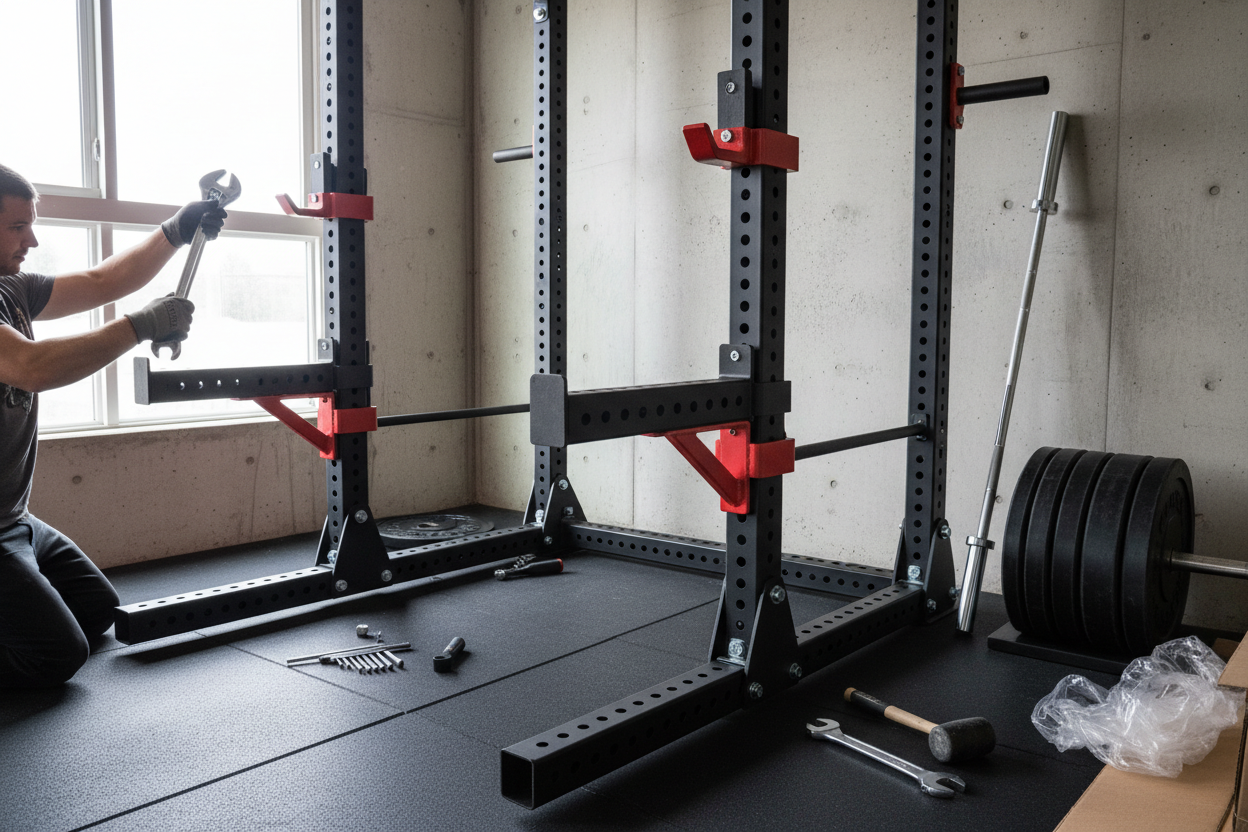
Seeing that freight truck pull up to your curb is one of the best feelings in the world for a home gym owner. You have spent weeks debating between the RML-3, the RML-390F, or maybe a folding wall-mount unit, and now a pallet of heavy 11-gauge steel is sitting in your driveway. While the excitement is high, the reality of the rogue monster lite rack assembly can quickly become daunting if you aren't prepared. The good news is that Rogue engineering is precise. Unlike cheaper imported racks where holes often don't line up, these American-made components are consistent. You can expect the entire process to take between one to two hours, provided you have the right tools—specifically a pair of 15/16” wrenches or sockets—and a clear workspace.
My own introduction to this process was a mix of enthusiasm and mild frustration. I decided to assemble my rack on a Tuesday evening after work, thinking I could knock it out in thirty minutes. I was wrong. I made the classic rookie mistake of tightening every bolt as soon as I inserted it. By the time I tried to install the top crossmembers and the pull-up bar, the uprights were slightly towed in, and nothing fit. I had to loosen every single nut I had just cranked down to get the frame square. That lesson stuck with me: keep everything loose until the structure is fully standing. It saves you sweat and a lot of cursing.
Gathering the Right Tools
Before you slice open the first box, check your toolbox. The Monster Lite series uses massive 5/8” hardware. The bolt heads and nuts require a 15/16” socket or wrench. This is a size that is missing from many standard home tool kits, which often top out at 3/4” or 7/8”. You do not want to realize this when the rack is half-built.
You will need two of them—one to hold the bolt head and one to turn the nut. An impact driver with a socket adapter changes the game entirely, turning a wrist-burning workout into a quick trigger pull. If you are mounting a folding rack to the wall, you will also need a drill, a level, and a stud finder. If you are bolting a standard rack to concrete, you will need a hammer drill and a masonry bit for the concrete anchors.
Understanding the Uprights and Spacing
One of the most confusing aspects of the rogue monster lite squat rack assembly for beginners is the orientation of the uprights. Rogue utilizes "Westside Hole Spacing" through the bench press zone. This means the holes are spaced 1 inch apart near the bottom and middle, and 2 inches apart near the top. You need to ensure that the tight 1-inch spacing is at the bottom of the rack. If you accidentally flip an upright upside down, your J-cups won't line up correctly for benching, and you will have to disassemble the entire side of the unit to fix it.
Lay your uprights on the ground first. Identify the bottom (Westside spacing) and the top (standard spacing). If you have a laser-cut logo on your crossmember, make sure it is facing the direction you want to see when you walk into the room. These aesthetic details are annoying to fix later.
The Assembly Workflow
Start by building the base or the side panels, depending on which specific model you purchased. If you have a flat-foot rack (like the RML-390F), assemble the feet and the uprights on the ground. Once you have the sides constructed, stand them up. This is the moment where having a second person is incredibly helpful. While I have built these alone by propping uprights against walls or boxes, balancing a 90-inch steel tube while trying to thread a bolt is a recipe for injury or damaged drywall.
Connect the crossmembers to stabilize the structure. Remember the golden rule: finger tight only. The rack needs to settle. Floors are rarely perfectly level, and the steel has a tiny bit of play in the bolt holes. Once all pieces, including the pull-up bar, are connected, shake the rack a bit. This helps the components settle into a natural alignment.
Squaring and Anchoring
Once the skeleton is assembled, check for squareness. Measure diagonally from the front left corner to the back right corner, and then compare it to the opposite diagonal. The numbers should be identical. If they aren't, shift the rack slightly until they match. This ensures your barbell sits straight in the J-cups.
Now you can tighten the hardware. Start from the bottom and work your way up. If you are using an impact driver, be careful not to strip the threads, though this is hard to do with Grade 5 or Grade 8 hardware. If you are using hand wrenches, put some muscle into it. You want these connections to be rock solid.
If you bought a standard stand (not a flat-foot), you must make a decision about anchoring. Rogue recommends bolting these units to the floor or a lifting platform. I have lifted on unbolted racks, and while they are heavy, they can walk or tip during aggressive re-racking of heavy squats or dynamic kip movements. For total peace of mind, sinking concrete anchors or bolting it to three layers of plywood is the safest route.
Dealing with Accessories
The beauty of the Monster Lite ecosystem is the accessories, but they can complicate the build. If you bought weight storage pins, spotter arms, or a slinger attachment, plan their placement before you tighten the main frame. Sometimes an accessory bolt shares a hole with a structural bolt. Realizing you need to remove a main structural bolt to add a plate storage pin after you've already torqued everything down is frustrating.
Maintenance and Safety Checks
After the initial rogue monster lite rack assembly is complete, the job isn't quite done. Steel compresses and bolts can loosen slightly after the first few heavy lifting sessions. Do a quick check after a week of training. Grab your wrench and ensure everything is still tight. Check the plastic on your J-cups to make sure they are seated correctly to protect your barbell knurling.
Building your own rack gives you a sense of ownership over your training that a commercial gym membership never will. You know exactly how it holds together, you know it's square, and you know it can handle whatever weight you plan to put on the bar. It transforms a pile of metal into the centerpiece of your daily discipline.
Frequently Asked Questions
Do I absolutely need to bolt the rack to the floor?
If you have a flat-foot model (like the RML-390F), bolting is optional as the extended base provides stability. However, for standard 4-post racks or wall-mount units, bolting to concrete or a dedicated wood platform is highly recommended to prevent tipping and walking during use.
Can one person assemble the Rogue Monster Lite rack alone?
Yes, it is possible, but it is physically demanding and slightly awkward. You will need to prop up the uprights creatively to attach the crossmembers. Having a second person to hold the uprights vertical while you insert the bolts cuts the assembly time in half and is much safer.
What size wrench is required for Rogue Monster Lite hardware?
The Monster Lite series uses 5/8-inch hardware, which requires a 15/16-inch socket or wrench. You will need two tools of this size: one to hold the bolt head stationary and one to tighten the nut.
