How to Effectively Exercise Your Back with a Power Cage
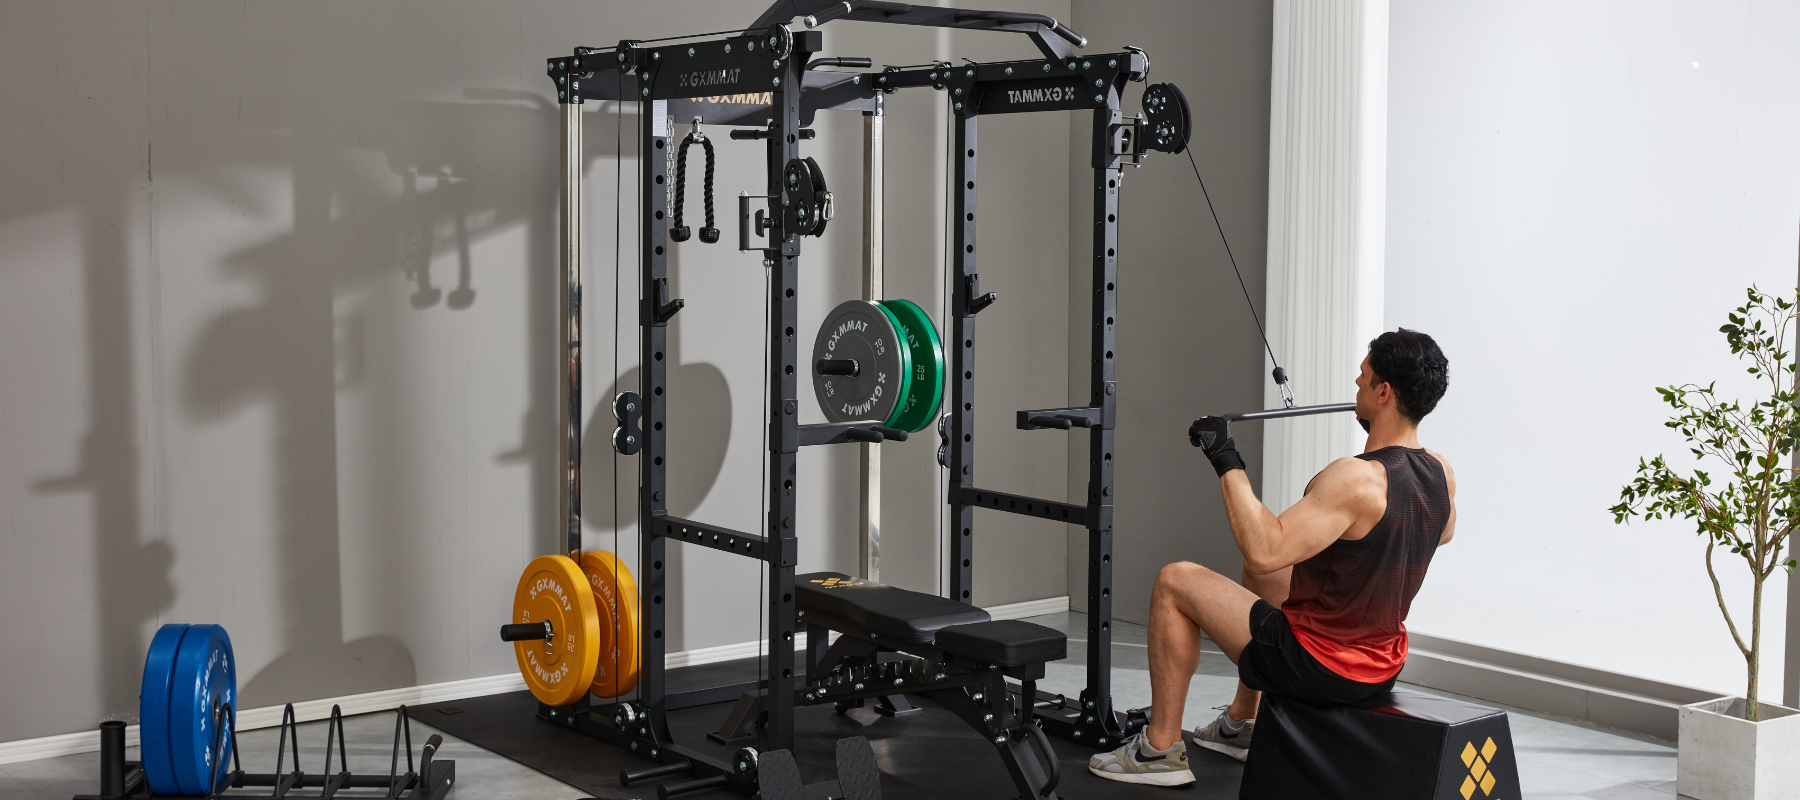
Forget the crowded cable station. If you’re serious about building a powerful, V-tapered back but your gym lacks a dedicated seated row machine, we have the ultimate solution already waiting for you: the Power Cage.
Often relegated to squats and bench presses, the power cage is a versatile powerhouse, and with a simple setup, it becomes the perfect platform for one of the most effective back exercises—the Seated Row. This guide will walk you through exactly how to master this movement, ensuring you build muscle, improve posture, and train safely.

Before we dive into the "how," let's talk about the "why." The Seated Row is a cornerstone exercise for a reason:
- Develops a Thicker Back: It directly targets the major muscles of your back, including the rhomboids, trapezius, and latissimus dorsi (lats), leading to improved thickness and density.
- Improves Posture: By strengthening the muscles that pull your shoulders back, it directly combats the hunched-over "desk posture" so common today.
- Enhances Grip Strength: Holding onto the bar throughout the set is a workout for your forearms and grip.
- Balances Your Physique: A strong back is crucial for balancing out a developed chest, preventing shoulder imbalances and injuries.
Why Use a Power Cage?
You might be wondering, "Why not just use a low pulley?" The power cage offers unique advantages:
- Superior Safety: You are training inside a fully enclosed rack. If you fail a rep, you can simply let go of the bar without the weight crashing down dangerously.
- Perfect Height Adjustment: The J-hooks and safety bars allow you to set the exact bar height for an optimal pulling angle.
- Versatility: One piece of equipment, countless exercises. This setup reinforces the cage as the centerpiece of your home or commercial gym.

The Step-by-Step Setup & Execution
What You’ll Need:
-
-
A Landmine Attachment or a corner of the cage (as a pivot point)
-
A Resistance Band (with a door anchor or a secure loop) or a V-Grip Handle attached to the band.
-
A Bench (optional, for comfort)
-
Step 1: The Setup
Position the Barbell: Place one end of your barbell securely into the landmine attachment or into a corner of the cage padded with a towel or a dedicated landmine base.
Anchor the Band: This is the key. Take your heavy-duty resistance band and loop it around the other end of the barbell (the end you'll be pulling). If you have a V-grip handle, attach it to the band now.
Secure the Band: Sit on the floor facing the barbell. Loop the other end of the band around your feet or the base of the power cage—somewhere it won't slip. You need enough tension in the band to mimic the weight stack of a cable machine.
Load the Weight: Slide your desired weight plates onto the end of the barbell that's in the landmine. The band provides the initial tension; the plates provide the primary resistance.
Take Your Seat: Sit on the floor with your knees slightly bent, or for added comfort and stability, sit on a low flat bench placed perpendicular to the bar. Ensure your feet are firmly planted.

-
Step 2: The Perfect Grip & Posture
Grip the Bar: Lean forward to grasp the bar (or V-grip) with both hands. Use a pronated (overhand) grip, slightly wider than shoulder-width. This grip emphasizes the mid-back muscles.
Find Your Starting Position: With your arms extended, sit tall. Your chest should be up, and your shoulders should be pulled down and back—avoid shrugging. Your spine should be in a neutral, straight position. Imagine a rod running from your head to your tailbone. This is your powerhouse posture for the entire movement.
-
Step 3: The Movement - The Pull
Initiate the Pull: Take a deep breath and brace your core as if you're about to be punched in the stomach.
Drive with Your Elbows: This is the #1 cue. Don't just pull with your hands. Focus on driving your elbows back and up, directly towards your lower chest/upper abdomen.
Squeeze Your Shoulder Blades: As you pull, imagine you're trying to squeeze a pencil between your shoulder blades. Hold this fully contracted position for a full 1-2 second count. Feel the deep burn in your mid-back!
Keep Your Torso Stable: Avoid using momentum by leaning back excessively. Your torso should remain solid and upright throughout the pull.

-
Step 4: The Return (The Negative)
Control the Weight: Don't just let your arms fly forward. Slowly and with control, extend your arms back to the starting position.
Feel the Stretch: As you reach full arm extension, you should feel a gentle stretch in your lats and mid-back. This maximizes the range of motion and muscle activation.
Exhale: Breathe out as you complete the return phase.
Repeat for the desired number of repetitions.
!Common Mistakes to Avoid
- Rounding the Back: This turns a back exercise into a spinal injury risk. Maintain a neutral spine at all times.
- Using Momentum (Body): Jerking or leaning back to move the weight means the weight is too heavy. Your back muscles aren't doing the work.
- Shrugging the Shoulders: Keep your shoulders away from your ears. Initiate the movement by retracting your shoulder blades, not elevating them.
- Pulling to the Neck: You are not doing an upright row. Pull towards your sternum or upper abdomen, not your chin or neck.
- Incomplete Range of Motion: Don't sell yourself short. Achieve a full stretch at the bottom and a hard squeeze at the top.
Pro Tips & Variations
-
Grip Variations:
- Supinated (Underhand) Grip: Places more emphasis on the lats and biceps.
- V-Grip / Close-Grip: Targets the mid-back and rhomboids more intensely.
- Tempo Training: Try a 3-1-2-1 tempo: 3 seconds on the negative, 1-second pause at the stretch, 2 seconds to pull, 1-second squeeze.
- Increase Difficulty: Use a thicker resistance band or add more weight plates. You can also perform single-arm rows for addressing muscle imbalances.
-
Sample Workout Integration
Incorporate the Power Cage Seated Row into your back day, typically for 3-4 sets of 8-12 repetitions.
-
-
Exercise 1: Pull-Ups or Lat Pulldowns (for lats width)
Exercise 2: Power Cage Seated Row (for back thickness)
Exercise 3: Bent-Over Barbell Rows (for overall mass)
Exercise 4: Face Pulls (for rear delts and shoulder health)
-
Exercise 1: Pull-Ups or Lat Pulldowns (for lats width)
Conclusion: Master Your Back Workout
The seated row is non-negotiable for a complete, well-developed back. By leveraging the safety and versatility of your power cage, you no longer have an excuse to skip it. You have everything you need to build the strength and physique you deserve.
So, step into that rack, set it up with confidence, and start rowing your way to a stronger, healthier you.
What’s your favorite power cage hack? Share your tips and tricks in the comments below!

Leave a comment
This site is protected by hCaptcha and the hCaptcha Privacy Policy and Terms of Service apply.