Your Complete Guide to Setting Up a Power Rack at Home (Without Losing Your Mind)
Setting up a home gym was one of the best decisions I ever made for my fitness journey. No more waiting for equipment, no more rushing to make it to the gym before closing time, and honestly, no more excuses. The centerpiece of my home gym is my power rack, and while it might look intimidating at first, getting it assembled and installed properly is absolutely doable – even if you're not exactly a DIY expert.
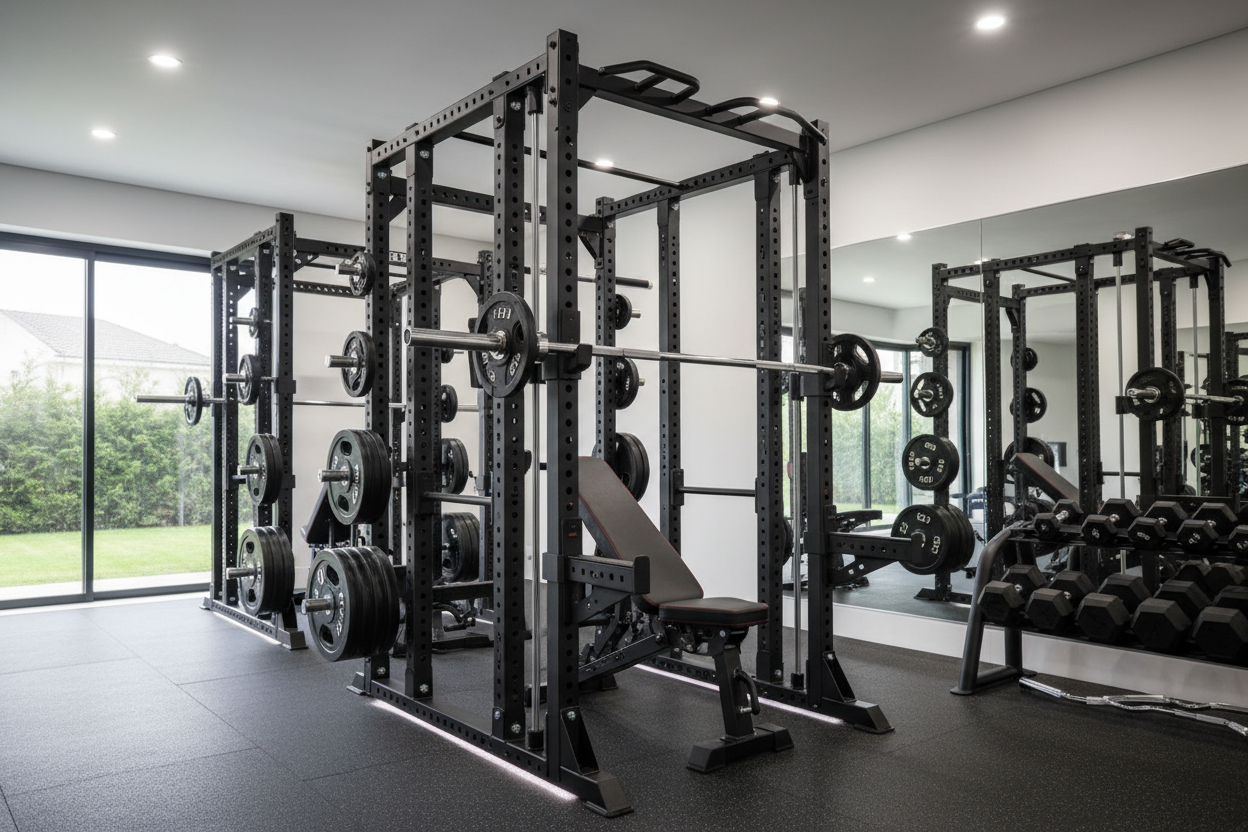
A power rack is genuinely one of the most versatile pieces of equipment you can own. It's your safety net for heavy squats, your spotter for bench pressing, and your foundation for pull-ups and countless other exercises. But before you can start reaping all those benefits, you need to get the thing put together and positioned correctly. Let me walk you through everything I've learned about making this process as smooth as possible.
Why Proper Installation Matters More Than You Think
Before we dive into the how-to, let's talk about why getting this right is so important. Your power rack needs to handle serious weight – we're talking hundreds of pounds potentially dropping onto the safety bars if you fail a lift. This isn't furniture assembly where being off by a few millimeters doesn't matter. Your safety depends on every bolt being tight, every connection being secure, and the entire structure being level and stable.
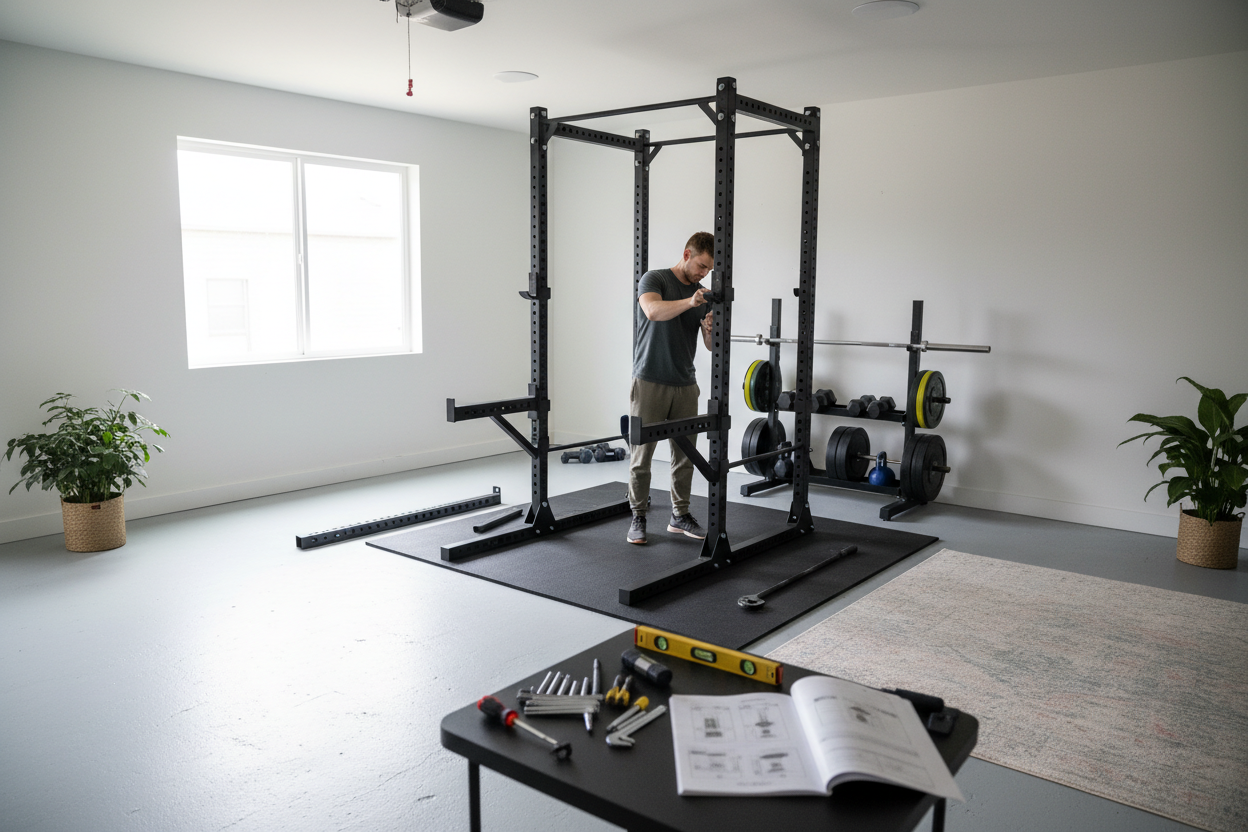
I'll be honest – when my power rack first arrived in several massive boxes, I had a moment of panic. But once I laid everything out and approached it methodically, it became much less overwhelming. The key is preparation and patience, not brute strength or advanced technical knowledge.
Before You Start: Essential Preparation Steps
Clear a proper workspace first. You'll need significantly more room than the rack's final footprint – think at least double the space in all directions. Trust me, trying to assemble this in a cramped area will only lead to frustration and potentially scratched floors or walls.
Check your delivery thoroughly. Count all the pieces against the parts list in your manual before you begin. Missing a single bolt or bracket can halt your progress completely, and it's much easier to contact the manufacturer early than to discover a missing part halfway through assembly.
Gather your tools. Most power racks require basic tools: adjustable wrenches, Allen keys (often included), a rubber mallet, and a level. Some people like using a power drill with the appropriate socket attachments to speed things up, but be careful not to over-tighten bolts, which can strip threads or crack welds.
How to Assemble Power Rack: Step-by-Step Process
Start by organizing all your parts into groups – uprights, crossbeams, hardware, accessories. Lay out the instruction manual where you can easily reference it. I know reading instructions isn't everyone's favorite activity, but skimming through the entire manual before starting gives you a mental roadmap of what's coming.
Begin with the base frame. Most power racks start by connecting the front and rear uprights with the bottom crossbeams. Don't fully tighten anything yet – finger-tight is perfect at this stage. You want everything loosely connected so you can make adjustments as you go. I made the mistake of fully tightening as I went on my first attempt, and let's just say I had to backtrack quite a bit when things didn't line up later.
Work your way up systematically. Once your base is loosely assembled, add the upper crossbeams and any middle supports. This is where having a second person becomes incredibly helpful. While you can technically do this solo (I did), having someone to hold pieces in place while you insert bolts makes everything exponentially easier and safer.
Square everything up before final tightening. Use your level to ensure the uprights are perfectly vertical and the base is level. This is crucial – an unlevel rack can cause uneven wear, make the safety bars less reliable, and just generally feel unstable when you're under a heavy barbell. Adjust as needed by slightly loosening bolts, repositioning, and checking again.
Now tighten everything properly. Work in a systematic pattern, gradually tightening all bolts rather than fully tightening one before moving to the next. This helps maintain alignment and prevents warping. Make sure every connection is firm and secure – give each bolt a final check even after you think you're done.
Power Rack Installation: Finding the Perfect Spot
Location matters enormously for your power rack. You need adequate ceiling height – at least 8 feet, though more is better, especially if you're tall or want to do pull-ups comfortably. Measure twice, position once. I initially planned to put mine in one corner of my garage, only to realize I'd bang my head on a low beam during pull-ups.
Consider your flooring carefully. Concrete is ideal for stability, but you'll want rubber mats or platforms to protect both the floor and your equipment. If you're installing on wood floors (like in a spare room), ensure the joists can handle the weight. A fully loaded power rack with a person and barbell can exceed 1,000 pounds. You might need to reinforce the floor or position the rack so the uprights sit directly over joists.
Think about your workout space requirements. You need clearance around the rack – at least 2-3 feet on all sides for loading plates, moving around safely, and potentially bailing out of lifts. Behind the rack, consider extra space for deadlifts if you plan to use the rack as an anchor point.
Securing Your Rack for Maximum Safety
Many people wonder whether to bolt their power rack to the floor. If you're working with extremely heavy weights or have a rack with a smaller footprint, bolting down adds crucial stability. For most home gym users with quality racks, the weight of the rack itself plus proper assembly provides sufficient stability, especially once you add weight plate storage.
However, if your rack feels at all wobbly or you plan to do explosive movements like kipping pull-ups, take the time to anchor it properly. This involves drilling into concrete (if you have a garage gym) or securing into floor joists (for indoor installations). Use the appropriate anchors for your floor type – concrete anchors for garage floors, lag bolts into joists for wooden floors.
Final Checks and Testing
Once everything is assembled and positioned, do a thorough safety check. Test every adjustment mechanism – slide the safety bars up and down, adjust the J-hooks, try any pull-up bars or dip attachments. Everything should move smoothly but lock securely into place.
Start with lighter weights initially. Even though your rack is rated for serious poundage, begin with moderate loads to ensure everything feels solid and secure. Pay attention to any unusual sounds, movements, or instability. It's normal for a new rack to settle slightly in the first few weeks of use, so recheck all bolts after your first few workouts.
Inspect your rack regularly. Make it a habit to check bolts monthly, especially in the first few months of use. Look for any signs of wear, particularly where metal meets metal. A quick visual inspection before each workout becomes second nature and takes just seconds.
Making the Most of Your Investment
Now that your power rack is properly assembled and installed, you've got an incredible tool at your disposal. This single piece of equipment can facilitate squats, bench press, overhead press, pull-ups, dips, rack pulls, and dozens of other exercises. You've created a safe environment to push your limits and build real strength.
The time you invest in proper assembly and installation pays dividends in safety and peace of mind. Every time you step under that bar, you'll know your equipment is solid and reliable. That confidence allows you to focus entirely on your workout, on pushing yourself, and on making progress toward your goals.
Your home gym is now ready for action. No more excuses, no more waiting – just you, your goals, and a properly installed power rack ready to help you achieve them. Now get in there and make it count.