
Home Training: Building a Smart Gear Ecosystem
I remember walking into a client's spare bedroom back in 2021. It looked like a fitness catalog exploded. A bulky elliptical blocked the closet, a single 35-pound kettlebell sat in the corner, and a flimsy doorway pull-up bar hung ominously overhead. She had spent over two grand, yet couldn't put together a cohesive workout. This is the trap most people fall into with home training. They buy isolated pieces of equipment instead of building an ecosystem.
- Stop buying random gear; think about how each piece interacts with what you already own.
- Start with premium flooring to unlock ground-based movements and protect your joints.
- Add an adjustable bench to instantly multiply your pushing and pulling angles.
- Sequence your purchases over a six-month period to avoid budget strain and clutter.
The Problem with Random Equipment Purchases
If you buy fitness gear impulsively, you end up with a cluttered, ineffective space. You see an ad for a core roller, buy it, use it for a week, and shove it under the bed. Next, you buy a pair of 20-pound dumbbells. Soon, your room is full of single-use items that simply don't talk to each other.
I call this the "Frankenstein gym." It lacks flow. In a commercial facility, machines are organized by body part and movement pattern. At your house, you don't have 5,000 square feet to play with. Every square inch must earn its keep.
This is where the ecosystem multiplier concept comes in. Instead of asking what a machine does in isolation, you should ask how a new piece of equipment interacts with your existing setup. A smart ecosystem means piece A plus piece B equals ten new exercise variations, not just two. It is about creating a network of gear that compounds your results.
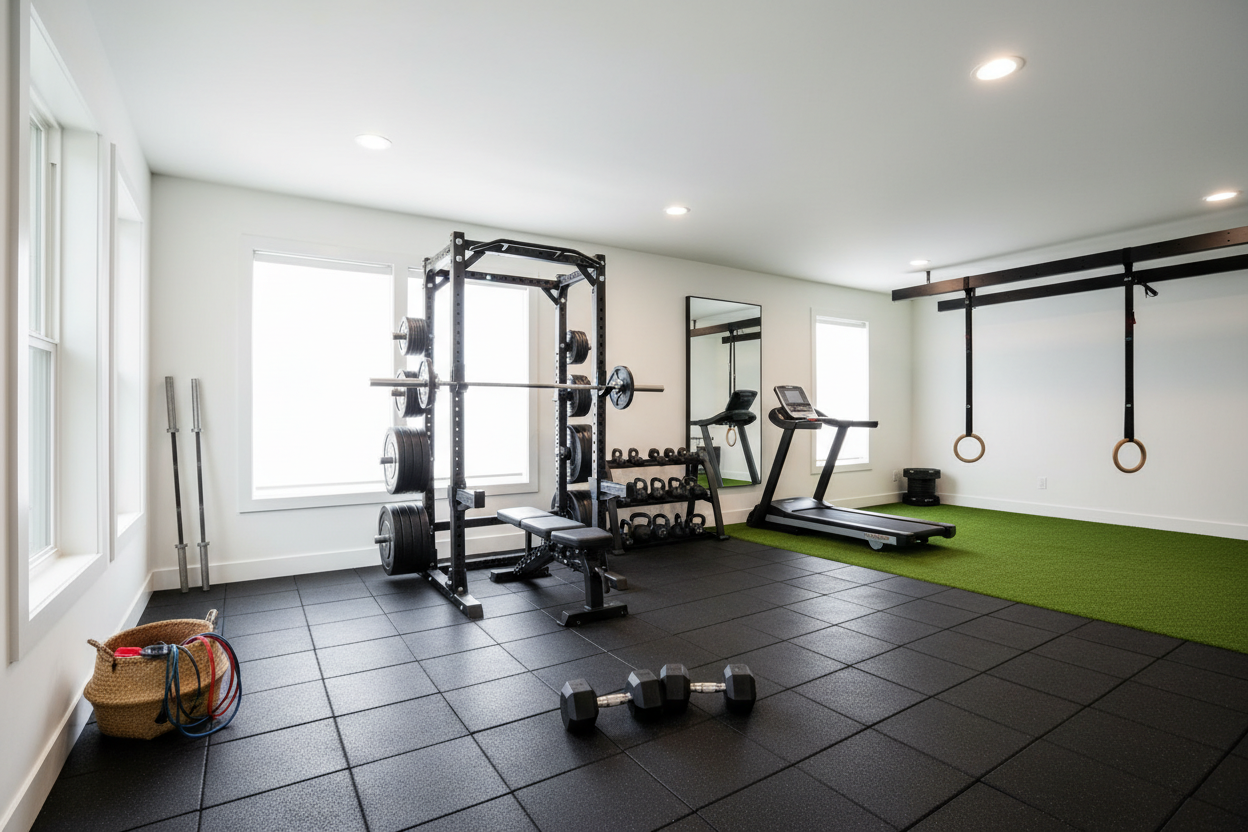
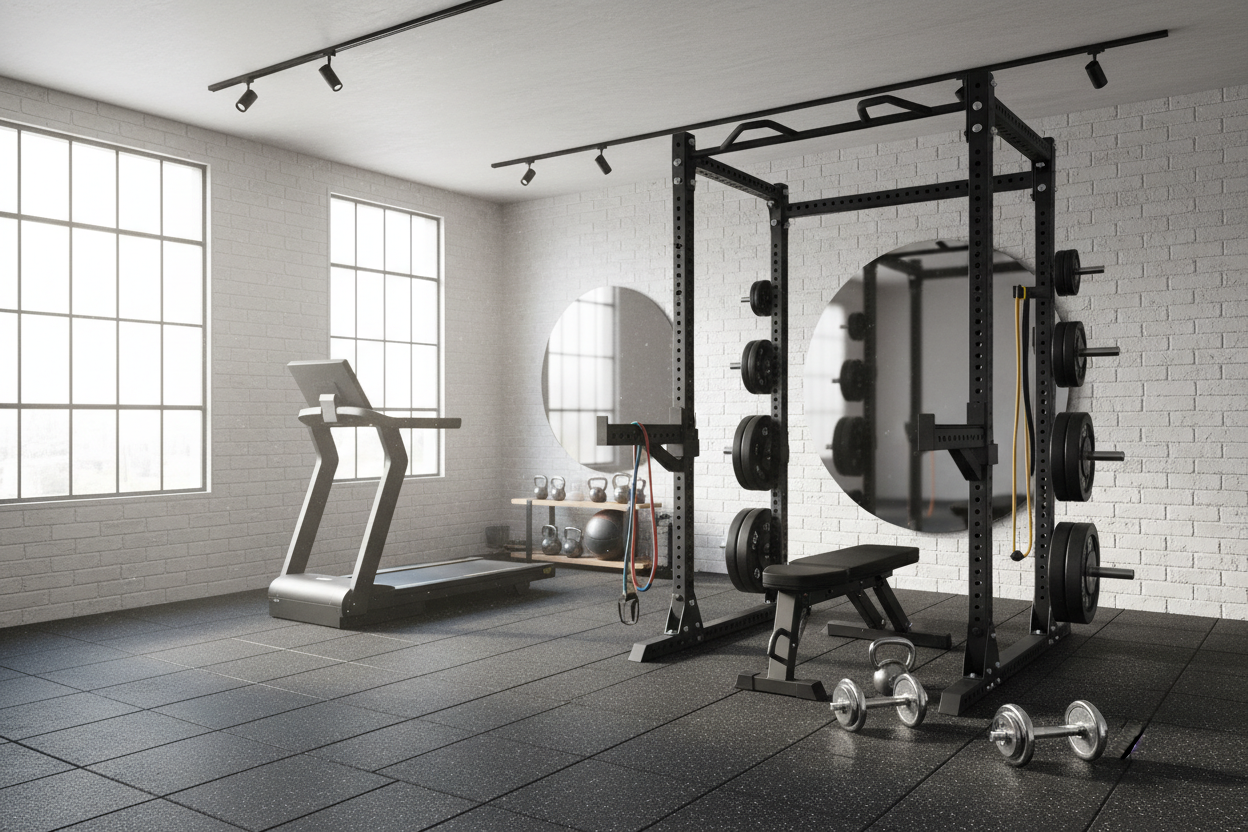
The Base Layer: Establishing Your Ground Zone
Before you even look at weights, you need to look down. Premium, spacious flooring is the foundational first step of any functional ecosystem. Hardwood floors and thin yoga mats severely limit what you can do. You won't do plyometric lunges on a slippery rug, and you definitely won't drop a heavy dumbbell on your landlord's tile.
When you invest in a large exercise mat for home gym use, you instantly unlock ground-based mobility, core work, and high-impact intervals. You need a surface that absorbs shock, dampens noise for the neighbors downstairs, and provides enough grip for lateral movements. I usually recommend a thickness of at least 7mm for barefoot training or light shoe work.
Size matters heavily here. A standard 2x6 foot mat is too narrow for speed skaters or wide-stance kettlebell swings. Upgrading to a 6x8ft exercise mat gives you exactly 48 square feet of dedicated, non-slip territory. This specific dimension allows enough room for a six-foot-tall user to perform traveling push-ups or full Turkish get-ups without rolling off the edge. Once your ground zone is established, the floor itself becomes your first piece of equipment.
The Multiplier: Adding Elevation and Angles
Now that you have a solid floor, it is time to manipulate gravity. Introducing an adjustable surface interacts directly with your base layer to instantly quadruple the number of pushing and pulling variations available. A flat floor only gives you one angle for pressing: horizontal.
When clients ask me why everyone needs a weight training bench, I explain the math. With a set of adjustable dumbbells (say, 5 to 52.5 lbs) and an adjustable bench, you go from doing standard floor presses to incline presses, seated shoulder presses, chest-supported rows, and Bulgarian split squats. The bench acts as a multiplier.
Look for a bench with a 1,000-pound weight capacity and a pad width of around 12 inches. Anything wider restricts your shoulder blades during rows; anything narrower feels unstable during heavy presses. The height should be around 17.5 inches from the floor, allowing your feet to plant firmly on your mat for leg drive.
The Load Vectors: Integrating Resistance
With your floor and bench acting as the stage, external resistance becomes the main act. Dumbbells are great, but they only provide downward resistance due to gravity. To build a complete training home setup, you need horizontal and diagonal load vectors.
This is where cables or leverage systems come into play. A simple plate-loaded pulley system that attaches to a wall or rack completely shifts your capabilities. You can now perform face pulls, triceps pushdowns, and lat pulldowns. When you combine a low cable pulley with your adjustable bench and your high-traction mat, you can mimic almost any commercial gym machine. Seated cable rows, incline cable flyes, and kneeling crunches are suddenly on the menu.
Eventually, you might want to consolidate. If you have the budget and the ceiling clearance (usually at least 84 inches), researching the best weight training machines will help you find a multi-station unit that caps off your ecosystem. A functional trainer with dual weight stacks fits perfectly into the corner of a 6x8 mat, tying the whole room together.
Sequencing Your Training Home Upgrades
Building this ecosystem shouldn't happen overnight. I tell my clients to sequence their upgrades over three to six months. This budget-friendly roadmap prevents bottlenecks and unused equipment graveyards.
Month one is purely about the base layer. Get your flooring down, establish the habit of working out in that specific room, and master bodyweight movements. Month two introduces the bench and a pair of adjustable dumbbells. Spend eight weeks exhausting the hundreds of variations this combination provides. Month four is for adding a cable system or resistance bands to introduce new load vectors.
Over the last five years, I have tested dozens of setups. My personal favorite addition was a wall-mounted dual-pulley system. It fit perfectly over my base mat and handled 250 pounds of resistance. The one honest downside? The nylon pulleys got incredibly squeaky after about 1,000 reps, requiring me to constantly lubricate them with silicone spray. Keep maintenance in mind as you build out your space.
How much space do I actually need for a functional setup?
You can build a highly effective ecosystem in as little as 50 square feet. A 6x8 foot area is the sweet spot, providing enough room for a bench, adjustable weights, and full-body floor movements without feeling cramped.
Are adjustable dumbbells durable enough for heavy lifting?
Yes, modern adjustable dumbbells are built to last, with many models easily surviving years of heavy use. However, their internal locking mechanisms mean they should never be dropped directly onto the floor, even on thick mats.
Can I put my equipment on carpet?
I strongly advise against it. Carpet compresses unevenly, making heavy lifts unstable and unsafe. It also absorbs sweat and odors. Always lay down a dense, dedicated exercise mat over carpeted areas to create a solid, hygienic foundation.