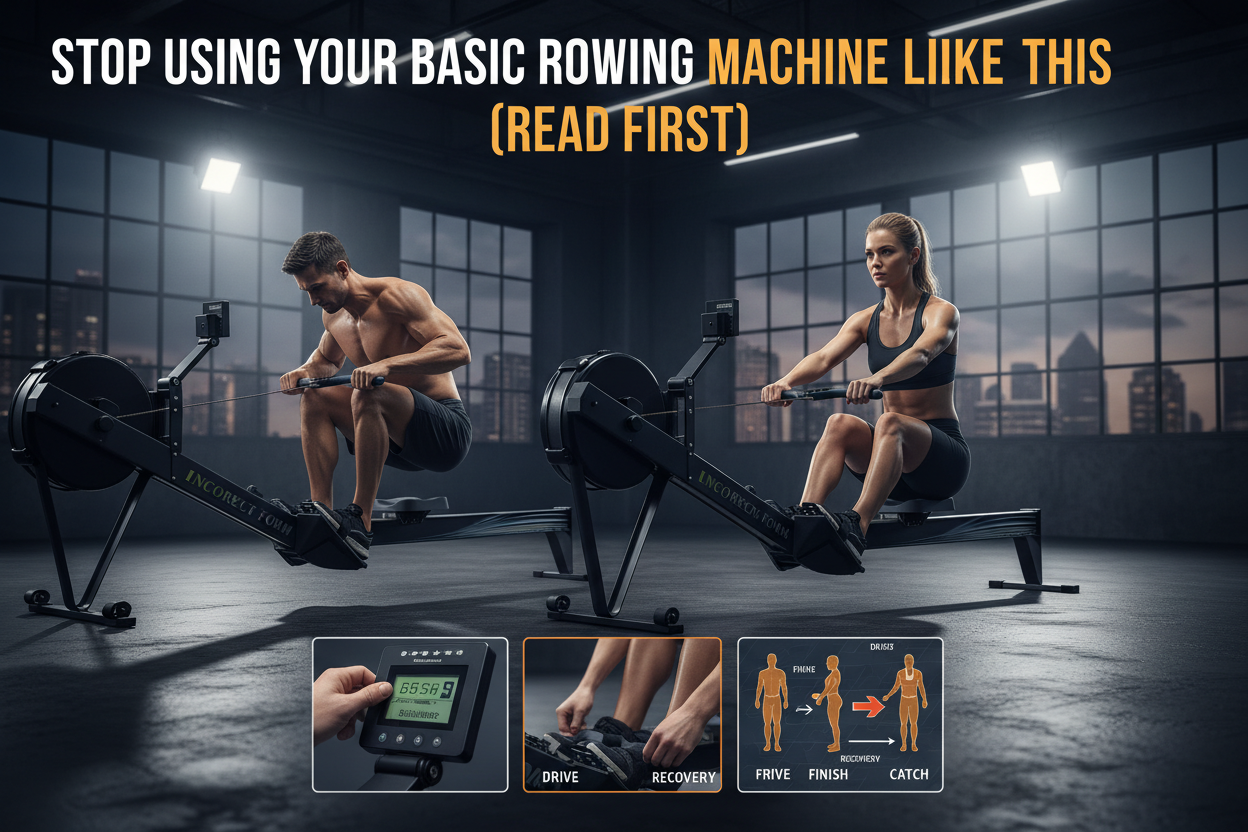
Stop Using Your Basic Rowing Machine Like This (Read First)
You see it sitting in the corner of the gym or perhaps gathering dust in your basement. The basic rowing machine looks deceptively simple. It’s a sliding seat, a handle, and a flywheel. Yet, it is arguably the most technically demanding piece of cardio equipment available.
Most beginners hop on, crank the resistance to 10, and start yanking the handle with their biceps. This isn't just inefficient; it's a fast track to a lower back injury. If you want to unlock the full potential of this machine—burning calories while building posterior chain strength—you have to respect the mechanics before you chase the intensity.
Key Takeaways: The Rowing Machine Guide
- Power Distribution: The stroke is 60% legs, 20% body swing, and 20% arms.
- The Sequence: Memorize this mantra: Legs, Body, Arms (on the drive) -> Arms, Body, Legs (on the recovery).
- Damper Setting: Setting the lever to 10 does not equal a better workout; keep it between 3 and 5 for a realistic water feel.
- Grip: Hold the handle loosely to prevent forearm fatigue; hang off the handle like you are doing a deadlift.
How to Set Up a Rowing Machine Correctly
Before you take a single stroke, you must configure the machine to your body mechanics. Ignoring this step is why many people find rowing uncomfortable.
Foot Strap Placement
This is the most common oversight. The strap should cross over the widest part of your foot (the ball of the foot). If it's too high, you’ll lose flexibility at the catch (the start of the stroke). If it's too low, your heels will lift excessively, destabilizing your power base.
Understanding the Damper
On an air rower, the lever on the side (usually numbered 1-10) is not a resistance brake. It is an air damper. Think of it like bicycle gears. A setting of 10 allows maximum air into the flywheel, making it feel like a heavy rowboat. A setting of 3-5 mimics a sleek racing shell. For metabolic conditioning and form work, stick to the 3-5 range. This allows for a faster turnover rate and better muscle engagement without overloading your lumbar spine.
How to Properly Use a Rowing Machine for Beginners
The rowing stroke is often misunderstood as a pulling motion. In reality, it is a pushing motion. It is a horizontal leg press that finishes with a back extension.
Phase 1: The Catch
Sit with legs compressed, shins vertical. Your arms should be extended straight in front of you, shoulders relaxed. Your torso should be leaning forward slightly (about 11 o'clock position). This is a position of tension, like a compressed spring ready to uncoil.
Phase 2: The Drive
This is where the work happens. Drive your heels into the footplates. Do not pull with your arms yet. Keep your arms straight and hang off the handle using your lats. Once your legs are nearly extended, swing your hips open. Finally, pull the handle to your sternum. The power comes from the explosive leg drive, not the arm pull.
Phase 3: The Recovery
This is how to use a rowing machine for beginners without gassing out in two minutes. The recovery is your rest. It should take twice as long as the drive. Extend your arms away from your body first. Then, pivot your torso forward from the hips. Finally, bend your knees to slide back to the start. If you bend your knees before your hands pass them, you’ll have to lift the handle over your knees, breaking your rhythm.
Common Mistakes to Avoid
Shooting the Slide
This happens when your seat shoots back, but the handle stays still. It means your legs pushed, but your core wasn't braced to transfer that power to the handle. The result is a weak stroke and significant strain on your lower back. To fix this, visualize the seat and handle moving together for the first few inches of the drive.
The Death Grip
Squeezing the handle too tight burns out your forearms before your legs even get tired. Hook your fingers around the handle and keep your thumbs loose. You should be able to wiggle your fingers during the drive phase.
My Training Log: Real Talk
I want to be transparent about my history with the basic rowing machine. When I first started incorporating rowing into my cross-training, I hated it. I treated it like a bicep curl machine.
I remember distinctly the first time I tried a 2,000-meter time trial. Around the 1,200-meter mark, my form completely collapsed. I wasn't just tired; I was fighting the machine. I recall the distinct sound of the chain slapping against the plastic housing on the return—a tell-tale sign that my hands were dropping too low because my shoulders were exhausted. But the worst part wasn't the muscles; it was the "rower's cough" I developed afterward from the dry air hitting my lungs and the raw, stinging blisters on my hands because I refused to stop gripping the handle like my life depended on it.
It wasn't until I slowed down, dropped my stroke rate to a boring 18 strokes per minute, and focused entirely on the leg drive that the numbers on the monitor actually improved. You have to earn the right to go fast.
Conclusion
Mastering the rowing machine guide takes patience. It is a skill-based conditioning tool. If you focus on the sequence—Legs, Body, Arms—you will find that you can row longer, burn more calories, and leave the gym feeling energized rather than beaten up. Start with short intervals, focus on your form, and let the power follow naturally.
Frequently Asked Questions
How long should a beginner row for?
Don't aim for duration initially; aim for stroke quality. Start with 5 to 10 minutes of continuous rowing, or break it up into intervals (e.g., 2 minutes on, 1 minute rest) for 15 minutes total. As your form stabilizes, you can increase the duration.
Does a rowing machine build muscle?
Yes, but it is primarily an endurance strength tool. It engages 86% of the muscles in your body, specifically targeting the quads, hamstrings, glutes, lats, and core. While it won't build bulk like heavy weightlifting, it builds a lean, powerful, and functional physique.
Why does my lower back hurt after rowing?
Lower back pain usually stems from a weak core or poor posture. If you slump at the catch (rounding your back) or lean back too far at the finish, you put shear force on your lumbar spine. Focus on sitting on your "sit bones" and keeping a tall, neutral spine throughout the movement.
