My Toes Are Safe: How to Choose the Right Dumbbell Storage for Your Home Gym
Nothing kills the momentum of a heavy chest day quite like tripping over a 50-pound weight you left on the floor. If you have started accumulating gear for your home training setup, you likely realized very quickly that dumbbells breed chaos. One pair turns into three, and suddenly you have a hazard zone rather than a sanctuary for gains. Organizing your free weights isn't just about aesthetics; it is a fundamental safety requirement and a way to protect your investment in expensive equipment.
Most people treat storage as an afterthought. They spend the bulk of their budget on a high-end barbell or a power rack, leaving the dumbbells to rust in a pile in the corner. This is a rookie mistake. A dedicated storage solution protects the knurling on your handles, prevents rubber heads from degrading on concrete, and saves your lower back from having to deadlift every weight off the floor before you even start a set. The right setup transforms a garage filled with iron into a professional training environment.
The Real Cost of Ignoring Organization
I learned the importance of proper storage the hard way during my first year of building a garage gym. I had snagged a great deal on a set of urethane dumbbells ranging from 5 to 75 pounds. Being budget-conscious, I decided the floor was good enough. That worked fine until I finished a set of heavy goblet squats to failure. My legs were jelly, my coordination was shot, and as I stepped back, my heel clipped the handle of a 40-pounder rolling slightly on the uneven concrete. I didn't break anything, but the bruise on my shin and the twisted ankle kept me from squatting for two weeks. That downtime cost me more in progress than the price of a decent stand. I bought a rack the next day.
Vertical vs. Horizontal: Analyzing Your Space
Space is usually the limiting factor in a home gym. Before you look at steel gauges or weight capacities, you have to look at your floor plan. Storage racks generally fall into two categories: A-frame (vertical) and tiered (horizontal). The best dumbbell storage rack for you depends entirely on how much square footage you can sacrifice.
A-frame racks are the space savers. They store weights in a tower formation, usually holding pairs on opposing sides. If you are training in a spare bedroom or a tight corner of an apartment, this is likely your only option. They have a tiny footprint, often taking up less than two square feet of floor space. However, they have drawbacks. As you move down the tower, the weights get larger, and accessing the middle pairs can sometimes be tight if the spacing isn't engineered perfectly. You might pinch your fingers re-racking a 30-pound weight if the 40-pounder below it is bulky.
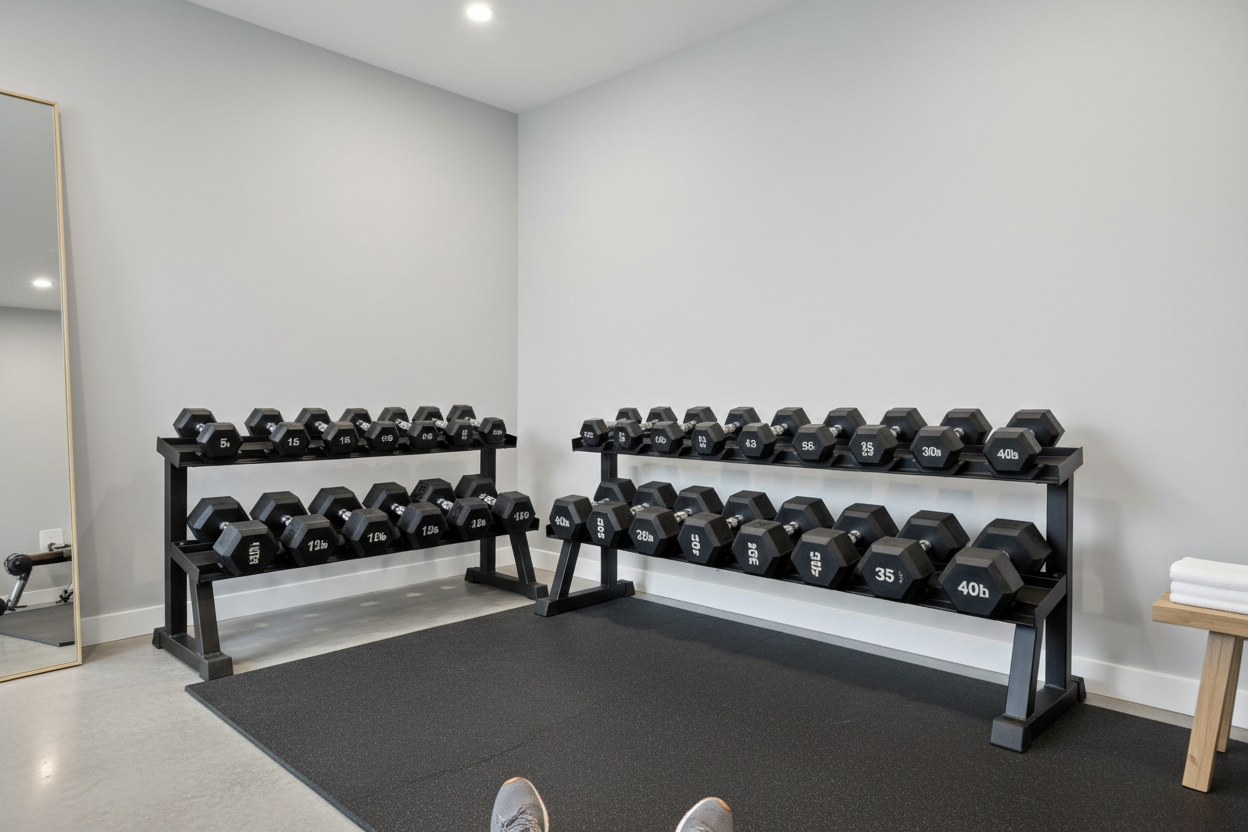
Horizontal tier racks are the gold standard for usability. These look like the long trays you see in commercial gyms. They require significant wall space, but they offer the best ergonomics. You can grab any weight without obstruction, and re-racking heavy loads is safer because you aren't maneuvering around other objects. If you have the linear footage along a wall, a two- or three-tier horizontal rack is superior for serious training.
Identifying Quality Construction
Not all steel is created equal. When you browse online, everything looks sturdy in the photos, but the specifications tell the real story. You want to look for racks constructed from 11-gauge or at least 14-gauge steel. The lower the gauge number, the thicker the metal. A rack made from thin, cheap sheet metal might hold up initially, but over time, the heavy loads will cause it to sway or buckle. Stability is non-negotiable when you are stacking hundreds of pounds of iron.
Pay close attention to the finish. A high-quality powder coat is essential, especially if your gym is in a garage or basement where humidity fluctuates. Cheap paint chips off when you slam a dumbbell back into the cradle, exposing the raw metal underneath to rust. A good powder coat creates a durable barrier that withstands the abuse of daily lifting.
Another subtle feature to look for is the presence of plastic or rubber liners on the rails or cradles. Metal-on-metal contact is noisy and damaging. Over time, racking a steel handle directly onto a steel rail will chew up the knurling—the texture that helps you grip the weight. Protective liners preserve your equipment and keep the noise down, which is a major plus if you train early in the morning while your family sleeps.
Versatility and Weight Capacity
You need to forecast your future strength. You might only have weights up to 50 pounds right now, but what happens in two years when you are pressing 80s or 100s? The best weight rack for dumbbells is one that can handle your heaviest potential set, not just your current warm-up weights. Check the total weight capacity rating. A solid rack should be rated for at least 1,000 pounds. Anything less is a toy.
Some racks offer versatility beyond just dumbbells. You can find options with flat trays for kettlebells or medicine balls, and angled rails for hex weights. If you run a hybrid style of training that utilizes various implements, a multi-storage unit might be more efficient than buying separate stands for everything. However, be wary of "all-in-one" units that try to do too much; sometimes they end up doing nothing particularly well. Specialized storage is usually sturdier.
The Ergonomics of Angled Shelves
If you opt for a horizontal rack, look for angled shelves. Flat shelves force you to bend your wrist awkwardly to lift the weight out. A shelf angled toward you allows for a natural grip and lift motion. This biomechanical advantage matters significantly when you are fatigued. Trying to wrestle a 90-pound dumbbell back onto a flat shelf with exhausted forearms is a recipe for a dropped weight or a wrist injury. The angle uses gravity to help slide the weight securely into place.
Organizing for Workflow
Once you have your rack, how you load it matters. The universal rule is heaviest weights at the bottom, lightest at the top. This lowers the center of gravity of the entire unit, making it impossible to tip over. It is also safer for you physically. You do not want to be lifting a heavy object over your head to put it away. Keep the heavy iron near knee or hip height where you have the most leverage.
Group your weights in logical increments. If you have a gap in your set (say, you have 20s and 30s but no 25s), leave a space on the rack if possible. It serves as a visual reminder of what you need to buy next and keeps the progression orderly. A clean, organized rack reduces mental clutter. When you walk into your gym and see everything aligned, it sets a professional tone for the workout. You aren't wasting mental energy looking for a missing 15-pounder; you are focused entirely on the lift.
Final Thoughts on Gym Safety
Investing in storage is investing in longevity. The floor is for your feet, not your equipment. By clearing the ground, you open up space for plyometrics, stretching, and unrestricted movement. Whether you choose a compact vertical tower or a heavy-duty horizontal beast, the goal is the same: a safer, more efficient training environment. Don't wait until you stub your toe to make the upgrade.
Frequently Asked Questions
Can I store kettlebells on a standard dumbbell rack?
It depends on the shelf design. Standard angled rails with a gap in the middle are specifically designed for dumbbells and won't hold kettlebells safely. However, many manufacturers offer universal flat trays that can be swapped in to accommodate kettlebells, medicine balls, or sandbags.
Do I need to bolt my storage rack to the floor?
For most residential dumbbell racks, bolting it down is not required if the rack is loaded correctly with the heaviest weights at the bottom. However, if you are using a tall, vertical storage unit and have small children or large pets who might climb on it, anchoring it to the floor or wall adds a necessary layer of safety.
How much space should I leave around the rack?
You should aim for at least two to three feet of clearance in front of the rack. This ensures you have enough room to safely pull a heavy weight off the shelf, step back, and assume your lifting position without your elbows or the weights hitting a wall or other equipment.