Gymnasium Floor Installation: What to Know Before You Build
Whether you are outfitting a high-end garage gym, a community center, or your dream indoor basketball court, nothing ruins the experience faster than dead spots, hollow echoes, or warped boards. A proper gymnasium floor installation is the critical difference between a surface that lasts generations and a costly renovation waiting to happen.
While picking the right power rack or treadmill is important, your flooring is the literal foundation of your athletic performance. In this guide, we will walk you through the structural essentials, material choices, and environmental factors you need to consider before laying down a single plank.
Key Takeaways
- Moisture control is non-negotiable: A high-quality vapor barrier prevents concrete condensation from destroying your wood.
- Subflooring dictates performance: The sleeper and pad system provides the necessary shock absorption and ball bounce.
- Acclimatization takes time: Wood materials must sit in the climate-controlled facility for up to two weeks before installation.
- Expansion gaps are crucial: Seasonal humidity shifts in North America require built-in perimeter gaps to prevent buckling.
The Anatomy of Gym Floor Construction
Proper gym floor construction is about much more than what you see on the surface. It is a multi-layered system designed to absorb impact, return energy, and withstand heavy loads from both athletes and equipment.
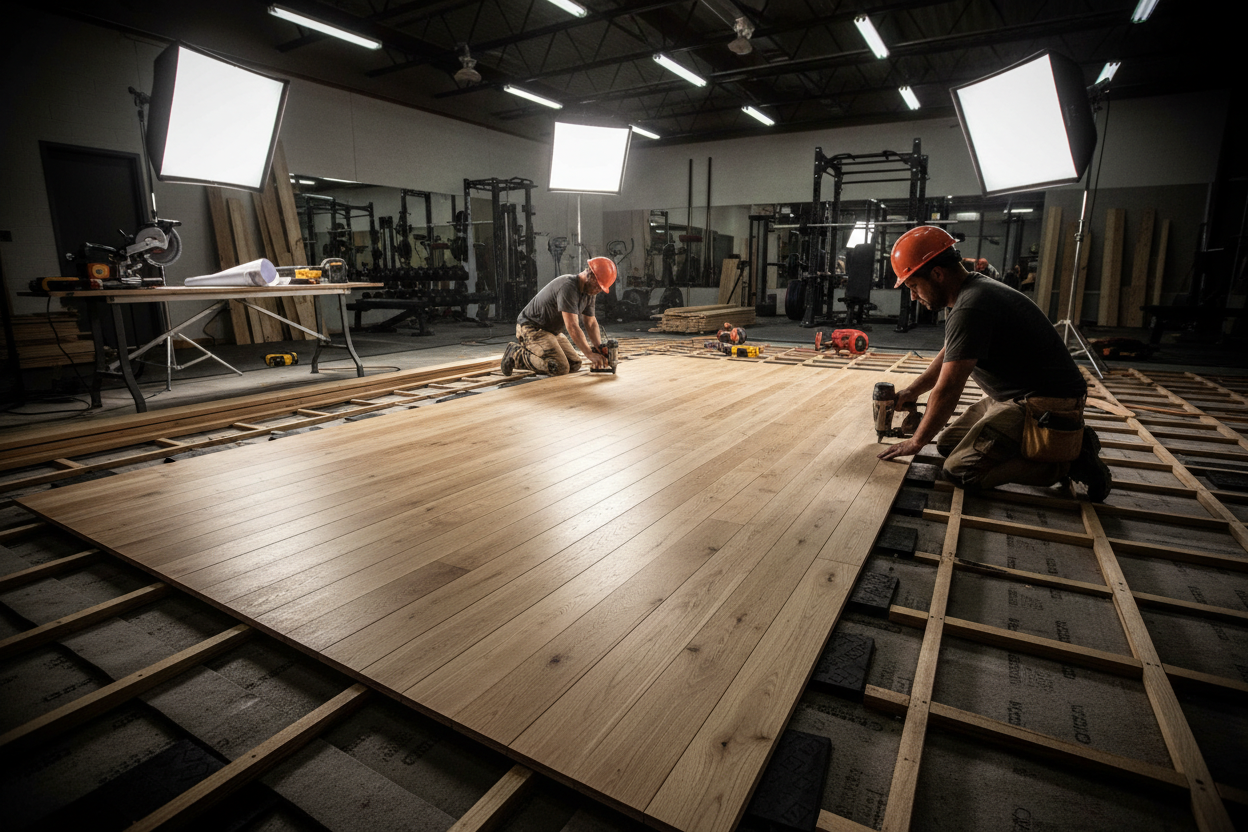
The Subfloor System
Below the shiny maple lies a complex matrix of vapor barriers, resilient pads, and wooden sleepers. For home and commercial gyms alike, a floating subfloor system is typically the gold standard. This allows the floor to flex safely under heavy barbell drops or jump landings, protecting both the athlete's joints and the building's concrete slab.
Mastering Hardwood Gym Floor Installation
If you are aiming for that classic, squeaky-clean aesthetic, hardwood gym floor installation requires meticulous attention to detail. Northern Hard Maple is the industry standard due to its dense grain and resistance to splintering.
Acclimatization and Environmental Prep
Wood is a living material. Before installation begins, the HVAC system must be fully operational, mimicking the exact temperature and humidity the room will maintain year-round. Skipping this step guarantees shrinkage or expansion issues later.
Sanding, Sealing, and Finishing
Once the boards are nailed down, the floor undergoes multiple rounds of heavy sanding. After the dust is cleared, court lines are painted, followed by several coats of high-grade polyurethane finish. This seals the wood against sweat, spills, and daily abrasion.
Space Planning & Load Capacity
When planning your layout, you have to account for the vertical height the new floor will add. A standard sleeper system plus hardwood can raise your floor by 2.5 to 3 inches. If you are installing functional trainers in a basement with low ceilings, every inch counts.
Handling Heavy Equipment
While maple is incredibly strong, point loads from heavy machinery (like a loaded deadlift jack or a motorized treadmill) can dent the wood. Always plan to use high-density rubber stall mats over your hardwood in designated heavy-lifting zones to protect your investment.
From Our Gym: Honest Take
When we upgraded our primary testing facility last year, I oversaw the transition from basic rubber mats to a full hardwood setup. I will be honest: the acclimatization wait time tested my patience. We had stacks of maple sitting in our climate-controlled space for 12 days before the crew would even touch a nail gun.
But the payoff was immediate. The shock absorption from the dual-layer sleeper subfloor completely eliminated the shin splints I used to get during plyometric sessions. One vital lesson I learned: we had to ask the installers to reinforce the subfloor specifically in our power rack zones. Standard court spacing is great for basketball, but if you are dropping 400-pound deadlifts, you need a denser sleeper layout underneath to prevent the boards from cracking.
Frequently Asked Questions
Is a professional gymnasium floor installation worth the cost for a home gym?
If you are building a multi-purpose athletic space (like a basketball half-court that doubles as a weight room), absolutely. The shock absorption and longevity cannot be replicated by DIY snap-together tiles. However, for a pure powerlifting garage gym, thick rubber flooring over concrete is a more practical and budget-friendly choice.
How much height does hardwood gym floor construction add?
Depending on the subfloor system chosen, expect the finished floor to sit anywhere from 1.5 to 3 inches above your concrete slab. You must factor this into your ceiling clearance for overhead presses and tall power racks.
Can I install heavy gym equipment directly on hardwood?
You can, but it is highly recommended to place dense rubber mats under heavy racks, treadmills, and weight drop zones. This prevents gouging the polyurethane finish and protects the wood fibers from concentrated point loads.

