How to Build Bulletproof Abs With the Leg Lowers Exercise
Most people think core training begins and ends with crunches. They are wrong. If you want a midsection that is functionally strong and aesthetically defined, you need to master the art of eccentric control. Enter the leg lowers exercise.
This movement isn't just about moving your legs up and down; it is a masterclass in pelvic stability and deep core tension. Unlike dynamic movements that rely on momentum, leg lowering forces your abs to act as brakes against gravity. It is humble, it is difficult, and it is incredibly effective for anyone looking to fix their posture or improve athletic performance.
Key Takeaways: Quick Summary
- Primary Target: Deep core (transverse abdominis) and lower rectus abdominis.
- The Secret Sauce: It is an eccentric-focused movement, meaning the muscle works hardest while lengthening.
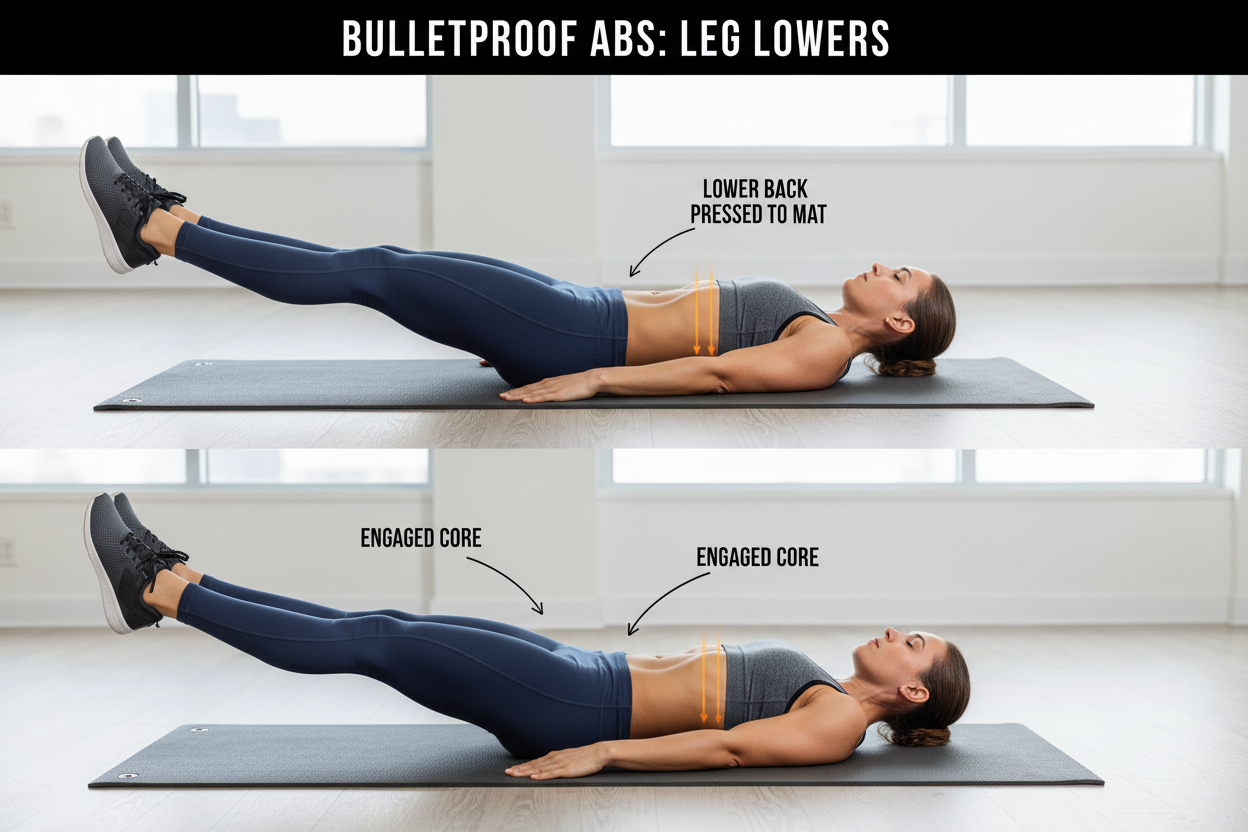
- Safety First: The lower back must remain glued to the floor to prevent strain.
- Regression: Use the single leg lower variation if your back arches.
- Progression: Slow down the tempo or add ankle weights.
Why the Leg Lowering Ab Exercise Works
To understand why this move is superior to standard sit-ups, you have to look at the mechanics. The leg lowers workout is primarily an anti-extension exercise. As your legs descend, the weight of your limbs creates a lever arm that tries to pull your pelvis forward and arch your lower back.
Your job is to fight that arch. By keeping your spine neutral against this heavy leverage, you engage the transverse abdominis—the body's natural weight belt. This is straight leg lowering at its finest: high tension with zero impact on the spine, provided your form is locked in.
How to Execute Perfect Leg Lowers
Form is everything here. A sloppy leg lower is just a hip flexor strain waiting to happen.
1. The Setup
Lie flat on your back on a yoga mat. Raise both legs toward the ceiling until they are perpendicular to your torso. Press your hands into the floor beside your hips for stability. If you have tight hamstrings, a slight bend in the knees is acceptable.
2. The Core Lock
Before you move, perform a posterior pelvic tilt. Imagine trying to crush a grape placed between your lower back and the floor. This is your anchor point. If you lose this connection, the set is over.
3. The Descent
Slowly lower both legs toward the ground. The keyword here is slowly. Take 3 to 5 seconds to reach the bottom. Stop just before your heels touch the floor—or sooner, if you feel your lower back starting to peel off the mat.
4. The Return
Exhale forcefully and pull your legs back to the starting position. While the upward phase is necessary, remember that the magic of leg lowers abs training happens on the way down.
Modifications: From Beginner to Pro
Not everyone is ready for the double leg version immediately. Ego lifting here leads to back pain, not six-pack abs.
Regression: The Single Leg Lower
If your back arches immediately, switch to the single leg lower. Keep one leg vertical (or bent with foot on the floor) while lowering the other. This reduces the load on the core lever, allowing you to build strength safely. This is the best starting point for postpartum mothers or those recovering from back injuries.
Progression: The Weighted Dragon Flag Prep
Mastered the bodyweight version? Place a light medicine ball between your ankles. The added resistance at the end of the lever arm increases the torque significantly, turning a standard leg lowers core exercise into an advanced strength feat.
Common Mistakes to Avoid
Rushing the Reps: Gravity is doing the work if you drop your legs fast. You need to fight gravity. If you aren't shaking by the third rep, you are moving too fast.
The "Rib Flare": Often, as legs go down, the ribcage pops up. Keep your ribs knitted down toward your hips. This ensures the tension stays in the abdomen and doesn't migrate to the thoracic spine.
My Training Log: Real Talk
I remember the first time I took leg lowers seriously. I was transitioning away from high-rep crunches because my neck was taking a beating. I thought, "It's just lifting legs, how hard can it be?"
The reality check was immediate. The hardest part wasn't the muscular burn—it was the mental focus required to keep that "posterior tilt." I distinctly remember the feeling of my t-shirt bunching up under my lower back; that became my tactile cue. If I felt the pressure of the floor leave that bunched-up fabric, I knew I had failed the rep.
There is also a specific, violent shake that happens when your heels are about three inches off the ground. That wobble isn't weakness leaving the body; it's your nervous system panic-firing to stabilize the spine. Embracing that shake, rather than rushing through it, is where I finally saw my lower abs start to pop.
Conclusion
The leg lowers exercise is a deceptive movement. It looks passive, but it builds aggressive core strength. By mastering the eccentric phase and respecting the limits of your pelvic control, you build a midsection that protects your back and enhances every other lift you do in the gym. Start with the single leg variation, earn the right to do both legs, and keep the tempo slow.
Frequently Asked Questions
Why does my back hurt during leg lowers?
Back pain usually indicates that your core has failed to stabilize the pelvis, causing your lower back to arch (hyperextend). This shifts the load from your abs to your lumbar spine. Switch to the single leg lower variation or reduce the range of motion until you get stronger.
How many reps of leg lowers should I do?
Because this is a control exercise, high reps often lead to form breakdown. Aim for 3 to 4 sets of 8 to 12 slow, controlled reps. Focus on time under tension rather than hitting a specific number.
Are leg lowers better than leg raises?
They are two sides of the same coin, but leg lowers are generally better for hypertrophy and strength due to the focus on the eccentric (lowering) phase. Muscles are capable of handling more load during the eccentric phase, making it a powerful trigger for growth.

